This blog post was originally published at e-con Systems’ website. It is reprinted here with the permission of e-con Systems.
Signal-to-Noise Ratio (SNR) measures the strength of the desired signal relative to the background noise. Demystify how SNR is calculated and develop an understanding of the practical steps to improve SNR.
Signal-to-Noise Ratio (SNR) probably is not as much of a discussion point today as it was 20 years ago. What was once seen as a daunting task, achieving high SNR has become a standard than a special feature in many applications today, especially in camera and imaging-based devices.
However, the term still remains a mystery to many. Though many have heard about it, not a lot of us understand what it means, how it is measured, or why it is important in cameras and embedded vision applications.
In this blog, we attempt to demystify the concept of Signal-to-Noise Ratio, how it is calculated, and its importance in new age embedded vision applications such as smart surveillance cameras, remote patient monitoring systems, autonomous checkout cameras, smart signage cameras, etc.
What is Signal-to-Noise Ratio?
Signal-to-Noise Ratio (SNR) measures the strength of the desired signal relative to the background noise, which is an undesired signal. SNR is imperative to distinguish various output signals to achieve efficient output.
Signal-to-Noise Ratio is typically expressed in terms of decibels. The higher the SNR value, the better is the output. The reason is that there’s more useful information (signal) than unwanted data (noise) in a high SNR output. For instance, an SNR of 100dB is better than 70dB.
How to calculate Signal-to-Noise Ratio
Calculating SNR can vary depending on the device. However, if the signal values are in the decibel form, then SNR is calculated by subtracting the noise quantity from the desired signal.
So, SNR= S-N, where S is the signal quantity and N is the noise level.
To illustrate this through an example, imagine that your device is receiving a signal of -50 dBm (decibels per milliwatt), and the noise level is -70 dBm. Then Signal-to-noise ratio can be calculated as:
SNR = -50-(-70) = 20dB
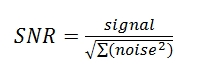
Another method to calculate SNR is by taking the linear ratio between the recorded signal and the total root mean squared noise as shown in the formula below, in which case it is called linear SNR.
Signal-to-Noise Ratio in embedded cameras
SNR in cameras indicates the signal quality found in an image. High SNR is required in many embedded vision applications, especially the ones which involve edge-based processing where AI/ML algorithms have to analyze the processed image to take intelligent decisions. This is because the image output in such smart AI cameras needs to provide the necessary details for functions such as people counting (in surveillance systems), demography analysis (in smart signages), crop detection (in agricultural robots, vehicles, and drones), object recognition (in autonomous shopping systems, robots), sample analysis (medical microscopes, diagnostic devices) etc.
High SNR also becomes necessary in low light camera modules where noise levels can have a far more significant and apparent impact on the image quality compared to cameras operating in normal lighting conditions.
Practical steps to improve the Signal-to-Noise Ratio of your embedded vision device
Sometimes to achieve high SNR, there’s a tendency to maximize the gain to improve signal strength. But this leads to spiking the signal as well as the noise. And you’ll notice that there are no major changes to the SNR value – meaning your imaging output may get better contrast, but it’ll continue to face the same quality issues.
So, while deploying embedded cameras in high SNR applications (like microscopes), certain practical steps need to be followed to ensure better quality output (with less noise). Hence, one needs to build/customize/deploy the camera with the right architectural design and use high-quality sensors. In addition, reducing the sensor’s temperature by properly dissipating heat can also help.
Low-noise cameras come with a low read noise image sensor. But in most cases – you also need to ensure active cooling. It would help manage other noise sources in the image sensor. However, this might add to the overall cost of the solution.
Low noise cameras from e-con Systems
e-con Systems over the last two decades has built a solid portfolio of low noise cameras that are suitable for various embedded vision applications. One of the most popular of them is See3CAM_CU55.
See3CAM_CU55 – a 5MP low noise USB camera – is a two-board solution comprises a camera sensor board based on the 1/2.5″ AR0521 image sensor from onsemi. It is a USB 3.1 Gen 1 camera that comes with an on-board Image Signal Processor (ISP) to ensure the best image quality even in low-light conditions. The 2.2-micron pixel 5MP AR0521 CMOS image sensor makes this camera perfect for next-generation applications such as surveillance, biomedical instruments, and biometric & access control systems.
Below is a list of all low noise cameras from e-con Systems:
- See3CAM_CU27 – Sony® Starvis™ IMX462 Ultra Low Light USB 3.1 Gen 1 Camera
- e-CAM82_USB – Sony STARVIS™ IMX415 4K Ultra-HD USB Camera
- See3CAM_CU22 – Full HD AR0233 HDR USB Camera with LFM
- See3CAM_CU20 – Full HD WDR HDR USB 3.1 Camera
- See3CAM_CU30 – 3.4 MP Low Light USB Camera
- See3CAM_30 – 3.4 MP Autofocus USB Camera with Liquid Lens
- Conversa® – Low Light USB Camera with Microphone
Hope we were able to explain the concept of Signal-to-noise ratio well in this article. If you have any further queries on the topic, please feel free to leave a comment. We shall get back to you as soon as possible.
If you are looking for help in customizing and integrating low-noise cameras into your products, please write to us at [email protected]. You could also visit our Camera Selector to get a full view of e-con Systems™’ camera portfolio.
Prabu Kumar
Chief Technology Officer and Head of Camera Products, e-con Systems