
This blog post was originally published at Au-Zone Technologies’ website. It is reprinted here with the permission of Au-Zone Technologies.
Creating a dataset can be one of the most challenging aspects of creating a reliable model to work with. At Au-Zone we created a playing card dataset to show off the capabilities of our in-house camera module along with the machine learning model training portal. The images for the dataset were all taken from the DeepView Vision Starter Kit | Micro itself and once was complete we used the eIQ Portal to train and create both classification as well as detection models in a proof-of-concept example.
A usable machine learning model required diverse and robust dataset. We will be going over a step-by-step breakdown of the process of the dataset creation as well as how different image conditions can increase the accuracy of the model.
To start off there were roughly 2000 images taken on the DeepView Vision Starter Kit | Micro using the eIQ Portal inbuilt feature to capture images using a remote device via the Ip address of the board. To get a robust model, images were taken with different surroundings. The images that were used for training were all very diverse in terms of how many cards were present and multiple orientations of the cards were used. A 52-card nonbiased deck of playing cards was which can be further broken down to 4 suites and each suite consisting of 13 cards from Ace – king. For this model 13 classes were created one for each number i.e.one for ace, one for two and so on.
To make the image capture process smooth and seamless, it is recommended to divide the images in small batches where each batch had distinct scenarios i.e. different background, different lighting, and different objects in the images. Once you have an idea of all the different scenarios you would like to tackle, it is advised to start with one card at a time and then moving on to multiple cards in each frame and by doing this increasing the model’s accuracy and ability to detect multiple cards in one frame.
Initially the images were taken in a well-lit room using a plain isolating background. Then from there the cards were moved to a noisier background. Thereafter, we repeated the process several times in different lighting conditions:
- All the lights turned off with closed blinds.
- Using just one lamp to illuminate the cards.
- Semi-lit room with various objects shadowing the cards.
Along with all the different lighting conditions it is also recommended to take images in different orientation and with various objects causing obstruction to the cards:
- Charging cable going over the cards.
- Coins to cover part of the cards.
Once a desirable dataset of images was created, it was important to label the cards in each image to train the model more reliable. The DeepView detection model requires there to be bounding boxes created around the card even for single card images. When creating the bounding boxes, you should try to capture only one card within the box and avoid any unnecessary background noise. However, if an object is slicing through the entire card or if a coin is placed on top of a card the bounding box should drawn around it. This allows the model to be trained so that the card can be detected even if the card is partially covered, or if card is only visible at an angle.
General Configurations:
The augmentation tool was used to increase the number of images used for training to generate a higher quality trained model with a relatively small number of training images. The augmentation tool may be used to change brightness, contract, saturation, orientation etc.
For this Cards performance detection model, the following settings were used:
| Parameter | Value |
| Weight Initialization | mbv3_small_320_VOC.h5 |
| Input Size | 320.320.3 |
| Learning Rate | 0.000001 |
| Batch Size | 10 |
| Epochs to Train | Infinite (set stop condition to stop at target and set target value to 1) |
| Scale | Small |
| Activation | relu6 |
| Optimizer | Adam |
Make sure that the “Scale” and “Weight Initialization” are both set to same size i.e., if one is small the other should be small.
Classification Model:
A classification model is typically used for imaging processing a known region of interest in a captured image. Classification models have lower computational requirements compared to detection models, so they are simpler and will have faster inference times. If the region of interest is fixed for a given use case, then a classification model would typically be a good fit. For example, if the detection of a vehicle in a specific parking spot could use a classification model, while the detection of multiple vehicles in random locations would require a detection model.
For the included playing card example, thirteen different classes were defined for Ace – King. When you present a card, it can be classified based on the images which were used to train the model. This model did not require long training times (roughly 60 minutes) and works well with a small dataset. Furthermore, in the eIQ portal the DeepView classification model can be divided in 3 subcategories:
All the models created below are done on the MCU (Micro Controller Units).
Performance – This model focuses on speed and gets the lowest possible run times.
- Our performance model was trained to 41 epochs with a learning rate of 0.00001 and batch size 10. Furthermore, the optimizer used was “Adam” and input image size was 128,128. The result we got had an accuracy of ~92%. This model when combined with the MCU model is best suited for hardware where memory is an issue.
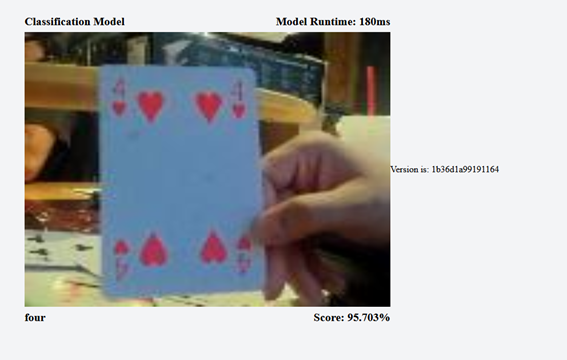
Balanced – This model focuses on finding the balance between the performance and accuracy model.
- Our balance model was trained to 43 epochs with a learning rate of 0.00001 and batch size 10. Furthermore, the optimizer used was “Adam” and input size was 128,128. The result we got had an accuracy of ~95%.
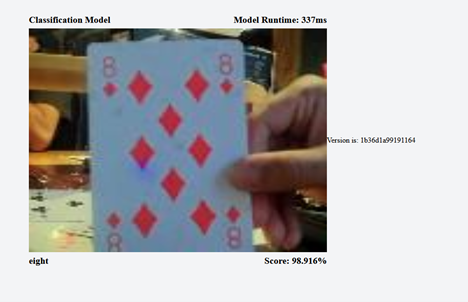
Accuracy – This model focuses on getting the most accurate results possible; however, the trade-off is to have longer runtime.
- Our accuracy model was trained to 41 epochs with a learning rate of 0.00001 and batch size 10. Furthermore, the optimizer used was “Adam” and input size was 128,128. The result we got had an accuracy of ~96%.
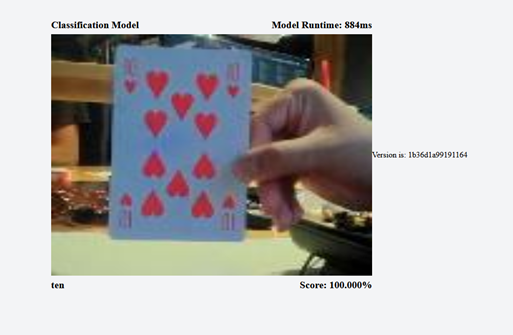
From the above images we can see that the runtime drastically increases when going from the performance to accuracy model however the accuracy of that model is much better. So, when deciding which model to go with it boils down to what is the application of the model, if the model is required to process data quicker it might be best to go with performance if the problem requires higher accuracy the accuracy makes more sense.
Detection:
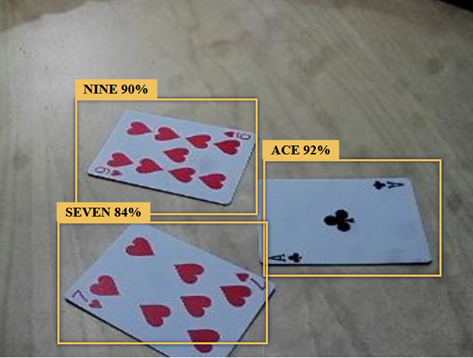
The DeepView Detection model can be taught to report what card is present in the image and where it is located. The DeepView detection model can report multiple cards in the image and report the label and confidence it has in its results. To get a highly efficient model high training time is required along with a large data set.
The DeepView Detection model is trained with 13 different classes and can detect any card out of the 13 classes. The training time for this model was extremely high as it took nearly 24 hours to get a functioning model. Furthermore, in the eIQ portal the detection model can be divided in 3 subcategories:
All the models created below are done on the MCU (Micro Controller Units).
Performance – This model focuses on speed and gets the lowest possible run times.
- Our performance model was trained to 112 epochs with a learning rate of 0.0001 and batch size 10. Furthermore, the optimizer used was “Adam” and input size was 320,320. The result we got had an accuracy of ~87%. This model when combined with the MCU model is best suited for hardware where memory is an issue. Training this model took about 12 hours.
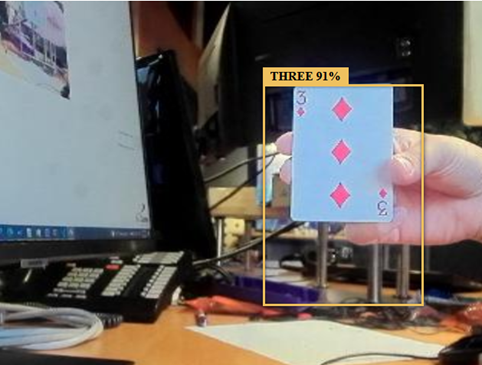
Balanced – This model focuses on finding the balance between the performance and accuracy model.
- Our performance model was trained to 207 epochs with a learning rate of 0.0001 and batch size 10. Furthermore, the optimizer used was “Adam” and input size was 320,320. The result we got had an accuracy of ~90%. This model when combined with the MCU model is best suited for hardware where memory is an issue. The model had 37000 steps and took about 17 hours
Accuracy – This model focuses on getting the most accurate results possible; however, the trade-off is to have longer runtime.
- Our performance model was trained to 311 epochs with a learning rate of 0.0001 and batch size 10. Furthermore, the optimizer used was “Adam” and input size was 320,320. The result we got had an accuracy of ~96%. This model when combined with the MCU model is best suited for hardware where memory is an issue. The model had around 61000 steps and took about 24 hours.
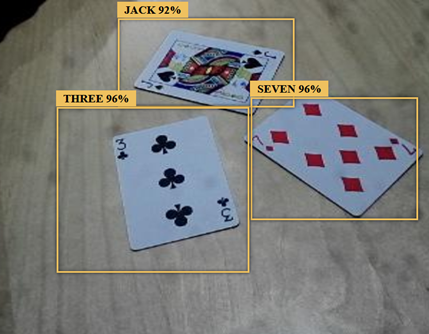
From the above images we can see that the training time change when going from the performance to accuracy model however the accuracy of that model is much better. So, when deciding which model to go with it boils down to what is the application of the model, if the model is required to process data quicker it might be best to go with performance if the problem requires higher accuracy the accuracy makes more sense.
Zhe He
Senior Embedded System Engineer, Au-Zone Technologies
Saksham Nanda
Firmware Intern, Au-Zone Technologies