This article was originally published at Tenyks’ website. It is reprinted here with the permission of Tenyks.
A quick setup guide for an NVIDIA TAO Toolkit (v3 & v4) object detection pipeline for edge computing, including tips & tricks and common pitfalls.
This article will help you setup an NVIDIA TAO Toolkit (v3 & v4) object detection pipeline. You will train a YOLO v4 tiny model on the Kitti dataset to obtain .etlt and .engine models ready to be deployed in DeepStream. We include a high level overview of hardware devices (e.g. Jetson, AGX), software modules (e.g. TAO), and a number of tricks that will save you precious hours when dealing with the TAO Toolkit setup. Finally, we will highlight a common problem when comparing models as the number of experiments begins to grow.
This is the first part of our Tenyks Series: NVIDIA TAO Toolkit ‘Zero to Hero’. In Part 2 we will showcase how to do model comparison, using the Tenyks platform as an example.
The main points discussed in this post are:
- NVIDIA TAO Toolkit Overview
- Key concepts in the NVIDIA ecosystem
- NVIDIA Tutorial Notebook Roadblocks
- Part 2 of the series: how to systematically compare models? (sneak peek)
This post is based on the NVIDIA documentation of the TAO Toolkit applied to YOLO v4 tiny.
Risk of mixing-and-matching TAO and TLT: .etlt models exported with the previous toolkit (i.e. Transfer Learning Toolkit or TLT) may seem to work with the TAO Toolkit, however this has unforeseen side-effects (including diverging model performances). We recommend to be consistent and NEVER mix-and-match the two, even if no errors are thrown: some of those warnings we are used to ignoring are in fact more dangerous than others.
NVIDIA TAO Toolkit Overview
What is the NVIDIA TAO Toolkit?

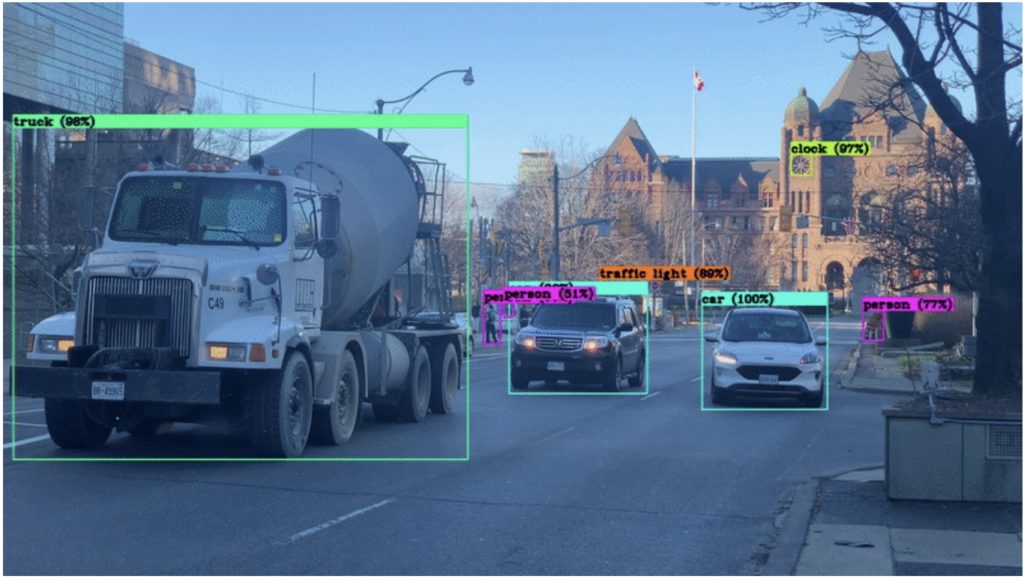
Figure 1. The NVIDIA TAO Toolkit with an object detection model
The NVIDIA TAO (Train, Adapt, Optimize) Toolkit allows you to fine-tune NVIDIA pre-trained models with your own data using transfer learning. Nothing to do with Taoism ️, I’m afraid.
The TAO Toolkit makes it easy for developers to integrate models such as YOLO v4 or SSD into their applications. It provides a simple API that allows developers to load the model and use it to perform object detection on images or video. The TAO Toolkit also includes pre-trained weights, which means that developers can get started right away without having to train a model themselves.

One of the main advantages of the TAO toolkit is that developers can load and run models with a few lines of code, reducing the time and effort required to integrate complex machine learning models into their applications. A second advantage is that the TAO Toolkit is also optimized for performance, helping developers to run deep learning models at scale in production environments. Finally, the TAO Toolkit was designed to be relatively easy to maintain in production environments.
TAO vs TLT
NVIDIA Transfer Learning Toolkit (TLT) was renamed to NVIDIA TAO Toolkit. To migrate from TLT 3.0 to TAO Toolkit make sure to uninstall the python package nvidia-tlt, and install the new package nvidia-tao. More information can be found here.
Model types: .tlt, .etlt and .engine
When you train a model using the TAO Toolkit you obtain a .tlt model. This model can then be pruned, and retrained. However this .tlt model cannot be deployed directly to DeepStream or to any other NVIDIA deployment framework such as Riva or Triton. First, you need to export the .tlt model. Running tao-export generates a .etlt model, which is an encrypted version of the .tlt one. This .etlt model can then be converted, using the command tao-convert, into a TensorRT .engine model.
TAO v3 vs. TAO v4
Nvidia has recently introduced a new and improved version of its TAO Toolkit: version 4.0.
The platform boasts several key upgrades, including AUTOML, a solution that automates the process of setting a model’s hyperparameters through multiple training experiments, providing the best performing configuration. Additionally, the TAO Toolkit API has been improved to include features for manipulating datasets and models within experimental workspaces, allowing for greater flexibility and ease of use. Finally, the toolkit now includes state-of-the-art transformer-based vision models such as Deformable DETR.
For those upgrading from versions 3.x, the following table provides an overview of the new container names to be used in your pipeline:

Table 1. Summary of differences between TAO v3 and TAO v4
More information about the NVIDIA TAO Toolkit
- TAO Toolkit quick start guide: contains a video and a text guide to run the TAO Toolkit (Hint: avoid getting stuck in the many obscure steps in the quick start guide by following the Notebook roadblocks section).
- TAO Toolkit architecture: provides a high level overview of the TAO Toolkit main components.
- Computer Vision Jupyter notebooks: Jupyter Notebooks with examples of the TAO Toolkit for computer vision models.
- NVIDIA developer forum for TAO: discuss with other developers the latest developments and applications.
Key Resources
During this post we will be relying on two main resources from NVIDIA:
- The original documentation of the TAO Toolkit with the YOLO v4 tiny application.
- The YOLO v4 tiny End-to-End pipeline notebook.
Key concepts in the NVIDIA ecosystem
Hardware
The Jetson Nano, Orin, and AGX are all NVIDIA development boards designed for use in building artificial intelligence applications. The trained model you will obtain at the end of this post can be deployed for inference in these devices. While they share many similarities, there are also some key differences:

Table 2. NVIDIA development boards overview
While the Jetson Nano and Orin are both capable of running deep learning models, the AGX development boards are likely to be the best choice for deep learning projects due to their exceptional computing power and ability to run multiple deep learning models in parallel. However, even the Jetson Nano can be a good choice for smaller high performing object detection projects.
YOLO v4 tiny

Figure 2. YOLO v4 tiny architecture
One state-of-the-art object detection model that is supported by the TAO Toolkit, and that you will be using during this series, is the YOLO v4 tiny model, which is a smaller and more lightweight version of the popular YOLO v4 model.
The YOLO v4 tiny model is a deep learning-based object detection model capable of identifying and locating objects in images and video frames with high accuracy. It employs a single convolutional neural network (CNN) to simultaneously predict multiple bounding boxes and class probabilities for objects in the input image.
This model is considerably smaller and faster than the full YOLO v4 model, rendering it well-suited for applications where real-time performance is important. It can also be run on lower-powered devices, such as smartphones and Raspberry Pi, which makes it a good choice for edge computing applications.
Dataset: Kitti dataset
During this series we will be using the Kitti dataset. Despite what the name might suggest, Kitti is not a dataset with images of cute kittens. We have the Cat Dataset for that.
In fact, this dataset contains video sequences collected from a car-mounted camera, and it is commonly used for training and evaluating computer vision and autonomous driving algorithms.
It is a relevant dataset because it provides a large amount of real-world data that can be used to develop and test machine learning models for tasks such as object detection and tracking. This is important because these models need to handle real-world data in order to be effective in practical applications.

Figure 3. Examples of Kitti dataset images (loaded in the Tenyks platform)
A number of companies have used the KITTI dataset to develop and test their autonomous driving systems. Some examples of companies that have used the KITTI dataset include Ford, Toyota, and BMW. One of the key advantages of the KITTI dataset is that it is large and diverse, with many different types of video sequences and a wide variety of objects and scenes.
Notebook roadblocks (TAO v3 only)
Tip: before we begin, NVIDIA recommends following these requirements:
Hardware
- 32 GB of System RAM
- 32 GB of GPU RAM
- 8 core CPU
- 1 NVIDIA GPU
- 100 GB of SSD space
Software
- Ubuntu LTS 20.04 (we tried 18.04 and noticed no problem)
- Python >= 3.6.9 < 3.7
- Docker-ce >= 19.03.5
- Docker-API 1.40
- nvidia-container-toolkit >1.3.0–1
- nvidia-container-runtime 3.4.0–1
We recommend following the notebook steps in parallel with the roadblocks outlined in this article.
Note: these roadblocks have been addressed in TAO v4, and are not applicable to it.
Roadblock # 1
In the section where you set up the environment variables to configure local directories for downloading the models, saving your results, among other things. Some of these variables might be confusing.
Solution: the relevant piece here is to use the same API key you obtain after creating an account on the NGC docker registry, and fill the environment variable KEY (line 5) with this API key.
Roadblock # 2
Having the wrong versions of the software requirements may trigger unexpected errors along the notebook (often with cryptic, or missing warnings). The sooner you find you have the wrong version of a component the better. Section 1, where you install the TAO launcher, is the perfect place to verify your system has the correct requirements.
Solution: open a new code cell on the notebook, and run the following commands to verify you have successfully installed all the requirements to successfully run this notebook.
!which python

!python --version

!docker --version

!nvidia-container-toolkit --version

!nvidia-container-runtime --version

----------------

Python 3.6.15

Docker version 20.10.18, build b40c2f6

NVIDIA Container Runtime Hook version 1.11.0

commit: d9de4a0

NVIDIA Container Runtime version 1.11.0

commit: d9de4a0

spec: 1.0.2-dev

runc version 1.1.4

commit: v1.1.4-0-g5fd4c4d

spec: 1.0.2-dev

go: go1.17.13

libseccomp: 2.5.1
Tip: some of the versions in your setup might be different, and they may work for this notebook. However, if you encounter any errors along the way, this is the first step you need to revisit: make sure to have the right software versions.
Roadblock # 3
In Section 2 you will download the dataset and the pre-trained model from the NVIDIA NGC registry. Unless you are an NVIDIA insider, you will scratch your head to download the model using the notebook code as it is:
!ngc registry model download-version \

nvstaging/tao/pretrained_object_detection:cspdarknet_tiny \

--dest $LOCAL_EXPERIMENT_DIR/pretrained_cspdarknet_tiny
Solution: modify the keyword nvstaging for nvidia
!ngc registry model download-version \

nvidia/tao/pretrained_object_detection:cspdarknet_tiny \

--dest $LOCAL_EXPERIMENT_DIR/pretrained_cspdarknet_tiny
Your output should be similar to the following one:
Downloaded 26.38 MB in 9s, Download speed: 2.92 MB/s

--------------------------------------------------------------------------------

Transfer id: pretrained_object_detection_vcspdarknet_tiny

Download status: Completed
Tip: this trick alone will single handedly save you unlimited scrolling on NVIDIA’s forums and hopelessly googling about it.
Roadblock # 4
In the subsection “2.3 Generate tfrecords” you generate the appropriate data records to work with tensorflow. When you run !tao yolo_v4_tiny dataset_convert the following error will show up:
RuntimeError: make_default_context() wasn't able to create a context on any of the 1 detected devices

2022-11-29 21:13:52,283 [INFO] tlt.components.docker_handler.docker_handler: Stopping container.
Solution: download the tao-toolkit-tf image directly from the NGC registry:
!docker pull nvcr.io/nvidia/tao/tao-toolkit-tf:v3.22.05-tf1.15.5-py3

-----

v3.22.05-tf1.15.5-py3: Pulling from nvidia/tao/tao-toolkit-tf

Status: Downloaded newer image for nvcr.io/nvidia/tao/tao-toolkit-tf:v3.22.05-tf1.15.5-py3
Tip: Reboot the instance after this step, otherwise the changes will not take place. As obvious as it sounds, this may save you between 15 minutes and a couple of hours on NVIDIA forums.
Tip: Verify you have one image for nvcr.io/nvidia/tao/tao-toolkit-tf:
!docker image ls

-----

REPOSITORY TAG IMAGE ID SIZE

nvcr.io/nvidia/tao/tao-toolkit-tf v3.22.05-tf1.15.5-py3 b85103564252
Roadblock # 5
In the subsection 2.4 after you install the NGC command line interface you will likely encounter a not found error that is evident when you call the registry to pull the pre-trained model (i.e. ngc registry) or when you verify the version of the NGC (e.g ngc — version).
Solution: here you have two options, 1) add ngc to your path:
!echo "export PATH=\$PATH:$(pwd)" >> ~/.bash_profile && source ~/.bash_profile
Or 2) use an absolute path from the ngc folder, and call the NGC registry and download the pre-trained model:
!/My/Absolute/NGC/Path/ngc registry model download-version nvidia/tao/pretrained_object_detection:cspdarknet_tiny \

--dest $LOCAL_EXPERIMENT_DIR/pretrained_cspdarknet_tiny
For instance in our case:
!/home/ubuntu/tao_nvidia/cv_samples_v1.4.0/yolo_v4_tiny/yolo_v4_tiny_blog_series/ngccli/ngc-cli/ngc registry model download-version nvidia/tao/pretrained_object_detection:cspdarknet_tiny \

--dest $LOCAL_EXPERIMENT_DIR/pretrained_cspdarknet_tiny
BONUS! Here we add a few extra tips and hints that will help you verify your pipeline is running properly:
- Tip: Reduce the number of epochs for the training and retraining processes by editing the num_epochs parameter in the following spec files:
!echo$LOCAL_SPECS_DIR/yolo_v4_tiny_train_iktti.txt

!echo$LOCAL_SPECS_DIR/yolo_v4_tiny_retrain_kitti.txt
- Tip: On average every epoch takes between 15 and 20 minutes, we recommend choosing a number of epochs smaller or equal than 5 for the first time. Even 1 epoch is a good choice for understanding the big picture of the TAO Toolkit: remember, we are fine-tuning a trained model, not training from scratch.
- 💡Hint: if you get a not found error regarding the mounting path between your local system and the TAO docker instance, the first thing you need to check is the configuration of your tao_mounts.json:
# Mapping up the local directories to the TAO docker.

import json

mounts_file = os.path.expanduser("~/.tao_mounts.json")

# Define the dictionary with the mapped drives

drive_map = {

"Mounts": [

# Mapping the data directory

{

"source": os.environ["LOCAL_PROJECT_DIR"],

"destination": "/workspace/tao-experiments"

},

# Mapping the specs directory.

{

"source": os.environ["LOCAL_SPECS_DIR"],

"destination": os.environ["SPECS_DIR"]

},

]

}

# Writing the mounts file.

with open(mounts_file, "w") as mfile:

json.dump(drive_map, mfile, indent=4)
NVIDIA’s docker setup is different from the traditional way of setting up docker. You can find more information here.
- Hint: The main objective of an NVIDIA pruned model is to reduce the amount of parameters and computations in a neural network while maintaining a high level of accuracy. This can be accomplished through a process called pruning, where the model is trained to identify and discard unnecessary connections and parameters within the network. We will address pruning and quantisation in future posts during this series.
- Hint: Verify that in Section 8, evaluating retrained models after pruning, you obtain a table listing the mAP for the classes displayed below:

Figure 4. Evaluating the retrained model after pruning
- Hint: in Section 10 exporting your model, follow the default steps to obtain a .etlt model, which will be converted to a .trt engine file.

Figure 5. Exporting a .tlt model into a .etlt model
- Hint: in Section 11, verify the converted engine model by visualizing TensorRT inferences:

Figure 6. Inference examples of the TensorRT model
Great Job! Congratulations on completing your TAO pipeline!
If you find these steps were not helpful, you can always visit NVIDIA documentation, and NVIDIA forums.
What is next: how to systematically compare models?
Now that we have successfully trained a high performance model on the NVIDIA ecosystem, we might be tempted to believe that our task is complete. However, there are a number of issues to consider, especially those related to systematically comparing and exploring our models:
Keeping track of models
- A lack of a diligent approach to track large datasets and complex models can lead to wasted resources as developers may end up using a suboptimal model.
- A deficient tracking of models can make it difficult to reproduce the results of previous experiments.
- Without tracking the performance of different models, it can be hard to identify potential problems such as overfitting or underfitting.
Comparing models

- In practice, you will likely train multiple TLT models (i.e. TLT1, TLT2, …, TLTn) on multiple datasets (e.g. original Kitti, a modified version of Kitti, etc).
- From each TLT you can extract several engine models (i.e. there are between 50 and 100 different configurations when you go from .tlt → .etlt → .engine)
- These engines are deployed on a variety of different environments
- Each environment may have different data distributions
As a consequence, we can end up with tens of hundreds of models for even one task!

Figure 7. How do we systematically compare models?
How do we address this problem?
We will explore ways of how to rigorously compare models in Part 2 of this series (coming soon), so stay tuned!
In the meantime you can see a sneak peek of the model comparison feature running in the Tenyks platform:

Figure 8. Model comparison feature in the Tenyks platform
Authors: Jose Gabriel Islas Montero, Dmitry Kazhdan.