
This blog post was originally published at Digica’s website. It is reprinted here with the permission of Digica.
Heart rate detection with Open CV
It’s probably no surprise to you that heart rate can be measured using different gadgets like smartphones or smartwatches. But did you know you can measure it using just the camera of your smartphone? One that isn’t necessarily from a top-shelf?
The good news is that it’s quite possible that in some 5 to 10 minutes you’ll know quite well how it works. Bon appetit!
You have to look slowly
Let’s start with some basic knowledge: most devices equipped with cheap RGB cameras are capable of recording videos in 30 frames per second which is well above the highest possible heart rate frequency.

By the way, fun fact is that North America television runs at a framerate of 29.97 FPS and European one – at 25 fps. A framerate higher than that will look at least weird to our eyes. When analyzing those frames one by one we (by “we” I mean our little Python scripts) can discover a surprising amount of information. Let’s introduce a little bit of theory.
A little bit of theory
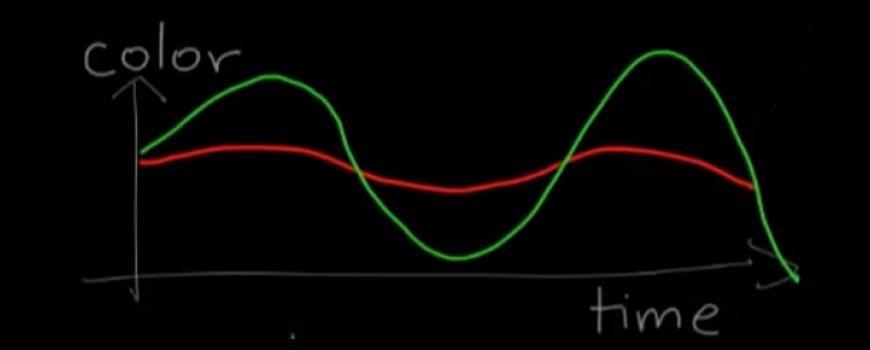
If we analyze the recording of your faces and amplify each color channel changes, it is possible that after partitioning the video into frames we see different colors pulsing alternately:

(I took some face and made color tweaks on my own. We could replace it with one of our faces)
Disclaimer: these images are more of an illustration. In reality, the colors don’t spread so evenly (due to shadows, fat, etc.). But I didn’t want to make things too complicated for now.
This pulse is visible because with each heartbeat our blood vessels become more greenish, and they remain more reddish in between:
Heart Rate Detection using Camera
This means that what we should do is isolate a sole green channel where the pulse is visible the most.
The other two channels are also helpful though. Why? Because thanks to them we can filter out external factors, such as variable lighting of the scene. We can do that by dividing the green channel values by the other channel values. The output would mean the frequency of the very pulsation we care about.
The next thing will be to use Fourier Transform (for all of you who are interested in the details of its implementation – a fantastic article on that supplied by Intel Software Innovators was published here).
So, let’s suppose we already capture camera output frame by frame and want to analyze color channels. What exactly would we like to look at? Is it the whole face? Or should it be just a part of it? How about a forehead, since it lacks shadows and other distractors? And most importantly, which algorithm to use?
Object detector
Whatever we decide to detect, it is quite probable that our old friend OpenCV will be helpful, since it’s light, quick and great for face recognition.
Detection using Haar feature-based cascade classifiers is a tool used for face detection. It was introduced in 2001 and its core is still used today. For anyone interested in its basic assumptions and details of how it works, here’s the link.
As you can see here, this classifier comes with numerous pre-trained weights used for actual detection of specific objects. It includes faces (frontal and profile, with and without sunglasses), body (full, upper or lower), smile, or eyes.
Do we see a forehead here? No, but we don’t need to. Let’s have a look at this image:

Here’s the basic thing you can do with OpenCV with some 30 lines of code: detection of face and eyes within it. So far so good, right? But what about the forehead?

If you are a bit creative, the coordinates of the forehead are already handed to you on a platter. The only thing you’ve got to do is make use of upper Y coordinates of eyes and upper Y coordinates of the whole face, combined with leftmost and rightmost X coordinates of either of them.
![]()
Ok, we’re close to the end. There are two small things to mention though.
Object tracking for better precision
The thing that’s left is the accurate tracking of the same pixels frame by frame. Why is that so important? Because the pixels turning dark can stem not from the pulse, but from the changes in texture between the parts of the skin we’re looking at. To put things simply, we have to be very precise to look at exactly the same places each time.
To make sure we do that, we can apply another OpenCV tools which you can easily find by googling “Open CV Object tracking”. What they do is they track characteristic points of an image and inform us what transformation was the object subject to.
Once we know how much the object moved, we apply the inverse transform to the image.
As you can see such tools are not only accurate but also resistant to e.g. occlusion:
Can all skin colors be covered?
As we base our algorithm on the green and red channels of a skin color, applying it to different skin tones might be tricky. However, covering multiple types of complexions, from bright skin (RGB: 255, 229, 200), to dark skin (RGB: 45, 34, 30) is possible according to the authors of this article.
Not only skin color but also body fat level, beard, fringe, glasses or wrinkles might either make the signal weaker or interfere with the skin parts we analyze. Sweat on the other hand can significantly change the skin light reflectivity causing camera image saturation. . Remember to take those into account when testing your algorithm!
By the way: I encourage you to question the quality of your testing dataset every time an image recognition topic is mentioned. As many researchers prove, Machine Learning algorithms tend to be tremendously biased (towards for example white skin color (link, link, link)). In case of ou algorithm I would strongly advise you to test your solutionon various skin colors throughout the whole development process.
Hope this article gave you some insight into how such algorithms can be made! And that you didn’t get too bored in the meantime:)
Sylwana Kazmierska
Data Scientist, Digica