This article was originally published at Hasty’s website. It is reprinted here with the permission of Hasty.
As the ML space is maturing, processes and best practices for what happens after you successfully manage a first project launch are becoming more popular. In this article, we are going through the concept of a data flywheel and how you can implement it.
It is not a secret that the actual value of an ML model comes when you deploy it into production and apply it to a real use case. However, a model trained on some well-known public datasets (ImageNet or COCO, for example) is likely to underperform in real-life scenarios. That’s because such datasets were gathered for research purposes and are often irrelevant for applied tasks. So if you are solving a real-world use case, you probably need to build a custom dataset.
Unfortunately, even with a custom dataset, you can not guarantee you have all the possible edge cases for your task covered. In the development stage, your model can work almost perfectly. Then, when you move it to a production environment and your users and customers start using it, it starts to underperform. The reason for this is the differences in the data you use when training, validating, and testing the model compared to the data the model encounters in the real world.
Let’s give a simple example. Imagine you want to detect whether the person’s eyes are closed or not via cropped frames of humans’ eyes from the webcam. For this task, you pick the MRL Eye Dataset consisting of various cropped images of human eyes in different circumstances (there are samples without glasses, with sunglasses, with regular glasses, etc.). It seems like the MRL dataset fits your task perfectly. After training a Neural Network on the dataset and getting excellent accuracy, you deploy the model into production but surprisingly face a significant accuracy decrease.
You start investigating the problem and suddenly find some edge case you did not even think of. For example, your model does not work as intended when the sun glares on glasses. So, there are edge cases where your model does not perform well.
This is a data shift problem. Fortunately, with the Data Flywheel approach, you will be able to solve problems like this when you find them in production – and more importantly, have a process in place for doing so.
What is the data flywheel?
Conceptually, the data flywheel is a straightforward yet powerful approach to identifying and fixing data shifts. The idea behind the data flywheel is to wrap the ML model development process into a continuous improvement loop. When following the data flywheel concept, you will be able to reduce your model’s wrong predictions over time.
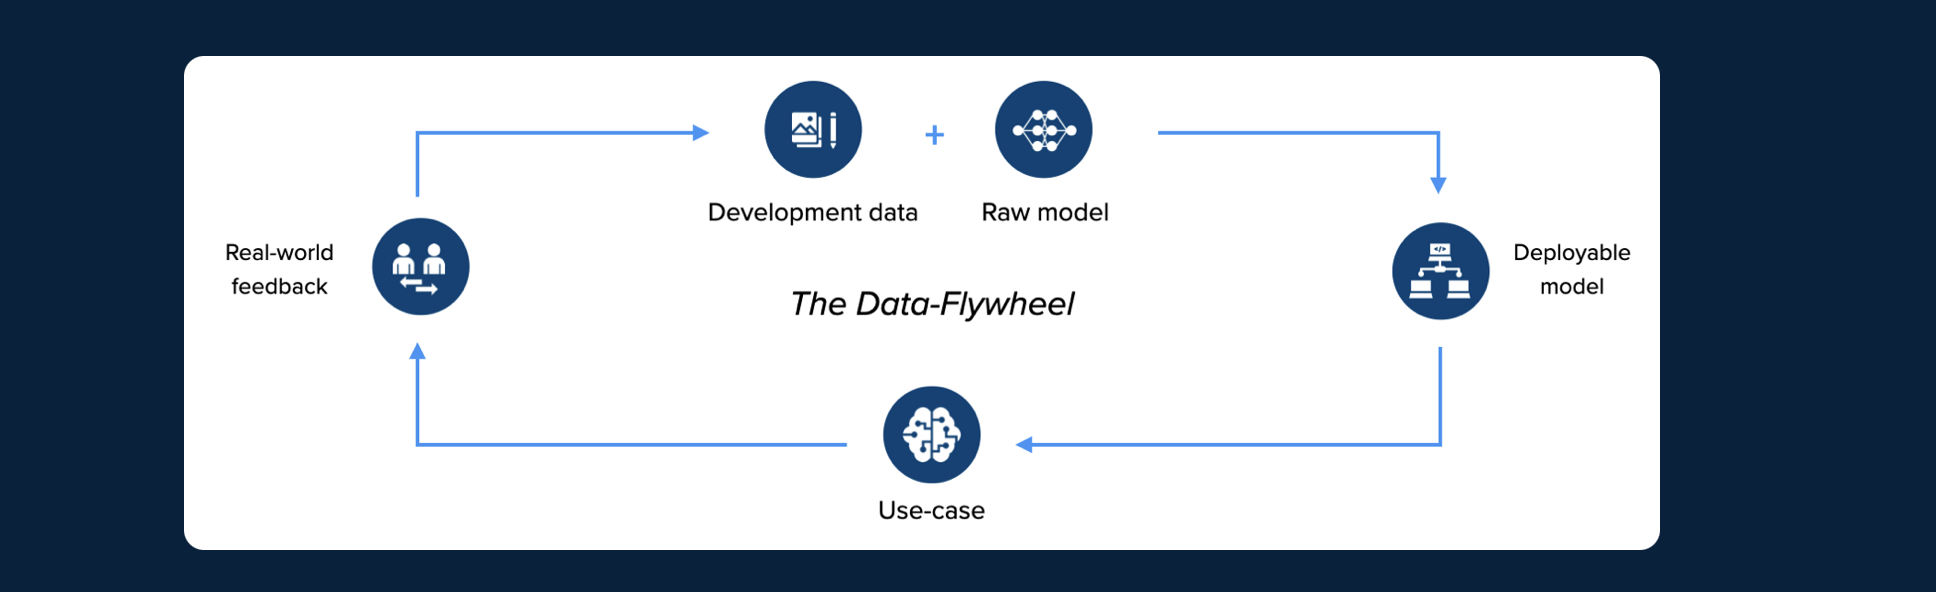
The Data Flywheel works as follows:
- When having an ML task to solve, you need to gather and label the initial dataset, train your model on it, and deploy the model into production;
- While testing your model in the production environment on real-world data, you need to flag the wrong predictions, identify their pattern, and highlight the general edge cases your model does not work on;
- Then you must get back to the labeling team with edge case data to annotate;
- When new data assets are labeled, and the initial dataset expanded, you should retrain the ML model.
- Rinse and repeat.
However, checking every single inference from the production environment by hand is time-consuming. That is why it’s better to come up with some logic around whether your model is performing as intended:
- You can check whether a particular ML metric on inference is underperforming to a certain threshold. If the model’s prediction metric is worse than you tolerate on specific data, you can automatically send such samples to the annotation workforce;
- Also, if it is possible for your organization, you can let users report when something is not working as intended. Such a self-reporting approach is beneficial as it helps to uncover unobvious issues on users’ side;
- Moreover, if you still want to review manually, you should use some data catalog tool to find the instances your model struggles on quickly. Unfortunately, it is a band-aid solution. It will help you uncover some issues but will not scale nicely.
Building AI models for applied AI use cases is a bit like a game of whack-a-mole. As more and more users use your model, you will find more and more edge cases. In our own experience, there’s always something that can be improved. This is especially true when you work with more “dynamic” data – i.e, when you are doing something outside of a controlled environment.
For example, if you do a quality control use case in a factory most variables are pretty static. You have a limited number of products, a camera you selected yourself, and a controlled environment that will not change over time. Having a data flywheel in place – for example, letting factory workers say if the model is working correctly or not – will help fix and improve the model at the start of the project. However, over time, you will have fewer and fewer reported errors.
On the other hand, the data flywheel is essential if you are working with something where you don’t control everything and dealing with more of a messy reality. For example, let’s say you have a car insurance app where users can take photos of damages to their car and then get an estimate on how their insurance premium will payout.
You create a model to identify the car model, find the damages and correctly classify them based on data you created yourself. But then, when you get your model to production, it turns out that it’s not working as intended. Users have different phones, different light conditions, damages not in the original dataset, etc. Beyond that, reality will change over time. Carmakers will introduce new models, damages will appear that you haven’t seen before, and users will get new phones.
For these use cases, you will need a version of the data flywheel in place throughout the model’s lifetime, as it will never be 100% done.
Pros and cons for Data Flywheel
Following the Data Flywheel concept has clear advantages. If you implement the flywheel loop, you will be able to:
- Overcome the data shift problem as time progresses;
- Continuously improve your ML model by addressing different edge cases;
- Build a system that ensures your model will adapt to new data if necessary.
However, there are disadvantages:
- Constantly labeling new data and retraining a model is costly;
- Ideally, you need to develop some logic to identify whenever it is time to retrain a model. You need to do it when the distribution of the updated dataset shifts to the extent that it influences the model’s predictions. However, identifying this point is tricky and probably requires some exploration internally to find your cadence;
- Some use cases simply don’t need it as there won’t be much of a change in the data compared to the original dataset.
Data Flywheel approaches
If you are not familiar with the term, Human-in-the-loop is a model that requires human interaction. The traditional Data Flywheel approach covered above is a Human-in-the-loop model that depends on the human workforce. In the conventional flywheel approach, you need a human presence on almost every stage of the loop, for example:
- Data annotation;
- Writing some code for model training;
- Model deployment;
- Feedback procession and edge cases identification;
- Labeling more data;
- And so on.
Such an approach is understandable and practical yet outdated and inefficient as it requires a significant amount of time and manual labor.
Nowadays, it is possible to upgrade the traditional Data Flywheel with some AI. To clarify, setting up an AI-based data Flywheel approach does not mean your entire flywheel cycle could be implemented without a human. The improvements occur because the AI-based system automates as many processes as possible.
The general idea is as follows. When setting up your flywheel, you should try to semi-automate it. With the modern tools and libraries, you can easily create a non-human working pipeline that will train and deploy an ML model, monitor its performance, and collect feedback. Moreover, to speed up some other processes, for example, data annotation, you can use additional AI assistance. If you succeed, you will only need humans for decision-making and data curation. Thus, semi-automating Data Flywheel will increase its efficiency time-wise, reduce some expenses, and make the life of your employees’ way more effortless.
The entire AI-based Data Flywheel concept is possible thanks to AutoML functionality and the availability of expert tools that aim to automate different parts of the ML lifecycle. So, if you want to explore the topic further, please check the AI software market and AutoML libraries.
Implementing Data Flywheel with Hasty
Concerning implementation, you should face no obstacles if you choose a suitable model development platform. The ideal scenario is to find a tool that will:
- Automate as many tasks as possible or at least make the ML lifecycle processes smooth enough;
- Provide seamless integration with the model in production through API endpoints;
- Offer no-code or almost no-code solutions for the different parts of the flywheel.
Fortunately, we in Hasty are up to the task. Let’s implement the flywheel, shall we?
Our task will be the Eye problem we have mentioned a few times earlier. If you remember, we wanted to solve an Object Detection task and classify whether humans’ eyes are open or closed via their cropped images. We will train an initial model, test it on some real-world data, aka the production data, and address the data shift problem using the Data Flywheel approach. We have prepared the Google Drive folder and the Google Colab notebook featuring the data used for this project and the code written outside Hasty for some extra support. Let’s jump in.
This project has a variety of steps, so we will use Hasty to speed up the process manifold. To start with, we downloaded the MRL Eye Dataset that we decided to use as a training set. MRL contains about eighty thousand cropped images of humans’ eyes, so we needed to perform data annotation before training an Object Detection model. However, to speed things up and simplify the task, we decided to take only about a thousand images for each class (open/closed eye) in our training set.

Fortunately, you will face no obstacles when labeling your data with Hasty because it offers an excellent annotation environment. Therefore, we could dive into the annotation process after uploading the pictures straightforwardly.

First, we defined the Label classes.

Second, we started to draw bounding boxes around the humans’ eyes in the pictures labeling them to the corresponding class. Hasty has a lot of manual annotation tools implemented, for example, polygon and brush, but since we had a simple Object Detection task, we decided to use bounding boxes.

Fortunately, we did not need to label all the images manually since Hasty offers AI-assisted annotation. After labeling a certain amount of data assets, Hasty automatically trains the Object Detection and Class predictor AI assistants. Moreover, the assistants are retrained and improved as the data annotation process goes.


When we annotated about 120 images, we automatically labeled the rest of the dataset using Hasty’s Automated labeling feature.


Still, we needed to check the quality of proposed annotations, so we used Hasty’s Quality Control tool Error Finder to highlight potential dataset errors.

We could see the QC results in a simple dashboard that allowed us to accept, reject or edit received suggestions. This feature helped us save time since we did not have to find errors manually.

We decided to train an Object Detection model using Hasty’s Model Playground when we were sure we had good labels. Before starting the experiments, we split the dataset, defined the type of Computer Vision task we wanted to carry out, and chose the sampling technique.

After the split, we could try different Neural Network architectures and parameters to get an optimal production-ready model, but decided to proceed with a Basic Object Detection preset offered by Hasty.


After the experiment, we checked the model’s performance, decided to export it, upload it to Google Colab, and check the model’s accuracy on the part of the MRL dataset the model has never seen before.


The model’s accuracy on validation was pretty good. Still, we needed to test it on some “production” data. For this purpose, we picked the Closed Eyes in the Wild (CEW) dataset that contains about 2600 images and randomly chose 1000 of them as the test set.

Unfortunately, our model underperformed on the CEW dataset because of the data shift. When we checked the images our model failed on; we found out that:
- The production data assets are way smaller (30 x 30 pixels) than the training set images (70 x 70 pixels). Thus, when resizing the production images to the 70 x 70 format, we lose some valuable information as the assets become blurry;
- There are a lot of difficult photos (for example, the eye is half-open, almost closed, but there is a visible line of the whites of an eye).
As the Data Flywheel concept suggests, we took the images our model failed on (about 80 additional photos) and uploaded them to Hasty to label them and enlarge the dataset. In our cases, we wanted our model to work better on blurry resized images and recognize all half-open eyes as corresponding to the open class.

We repeated every step described above:
- Data Annotation (of new data assets);
- Automated labeling;
- Quality Control;
- Training a model on the updated dataset.
As a result, we got an upgraded model that, in theory, should work better than its predecessor. We took another 1000 images from the CEW dataset and checked the accuracy again.

Despite adding only 80 images addressing the data shift problem, we were able to get a 2% accuracy increase. Imagine the potential improvement if we added 500 pictures. And what if 1000?
That is it. We have implemented the flywheel loop, went through it, and showed that it is possible to address the data shift problem using the Data Flywheel approach. Thanks for staying with us.

Final Thoughts
Hopefully, this post helped you get a more comprehensive picture of the benefits of implementing Data Flywheel.
To summarize, Data Flywheel is a simple yet powerful concept that will help you address the data shift problem and overcome it over time. The best way to implement the flywheel loop is to find a good model development platform to automate as many ML lifecycle processes as possible.
If you are in the process of starting up a new project, check out Hasty. We can help during the whole lifetime, providing data annotation, curation, and model-building features for you. There’s a free trial, so you can test it out before deciding if we’re the right solution for you.
If you are interested in replicating this experiment, please access the Notebook and Drive folder for the code and data for extra support.
Thanks for reading and happy training!
Shameless plug time
Only 13% of vision AI projects make it to production. With Hasty, we boost that number to 100%.
Our comprehensive vision AI platform is the only one you need to go from raw data to a production-ready model. We can help you with:
- Labeling 10x faster with our AI Assistants.
- Automating quality control, making it 35x faster, with our AI Consensus Scoring feature.
- Train models in our no-code Model Playground, which can then be used to improve labeling and QA automation even further.
- All while keeping you in control and your data safe.
All the data and models you create always belong to you and can be exported and used outside of Hasty at any given time entirely for free.
You can try Hasty by signing up for free here. If you are looking for additional services like help with ML engineering, we also offer that. Check out our service offerings here to learn more about how we can help.
Vladimir Lyashenko
Content Manager, Hasty