This blog post was originally published at NVIDIA’s website. It is reprinted here with the permission of NVIDIA.
Autonomous vehicles require large-scale development and testing in a wide range of scenarios before they can be deployed.
Simulation can address these challenges by delivering scalable, repeatable environments for autonomous vehicles to encounter the rare and dangerous scenarios necessary for training, testing, and validation.
NVIDIA DRIVE Sim on Omniverse is a simulation platform purpose-built for development and testing of autonomous vehicles (AV). It provides a high-fidelity digital twin of the vehicle, the 3D environment, and the sensors needed for the development and validation of AV systems.
Unlike virtual worlds for other applications such as video games, DRIVE Sim must generate data that accurately models the real-world. Using simulation in an engineering toolchain requires a clear grasp of the simulator’s performance and limitations.
This accuracy covers all of the functions modeled by the simulator including vehicle dynamics, vehicle components, behavior of other drivers and pedestrians, and the vehicle’s sensors. This post covers part of the validation of camera models in DRIVE Sim, which requires assessing the individual performance of each element, from rendering of the world scene to protocol simulation.
Validating a camera simulation model
A thorough validation of a simulated camera can be performed with two methodologies:
- Individual analysis of each component of the model ( Figure 1).
- A top-down verification that the camera data produced by a simulator accurately represents the real camera data in practice, for instance, by comparing the performance of perception models trained on real or synthetic images.
Individual component analysis is a complex topic. This post describes our component-level validation of two critical properties of the camera model: camera calibration (extrinsic and intrinsic parameters) and color accuracy. Direct comparisons are made with real world camera data to identify any delta between simulated and real world images.
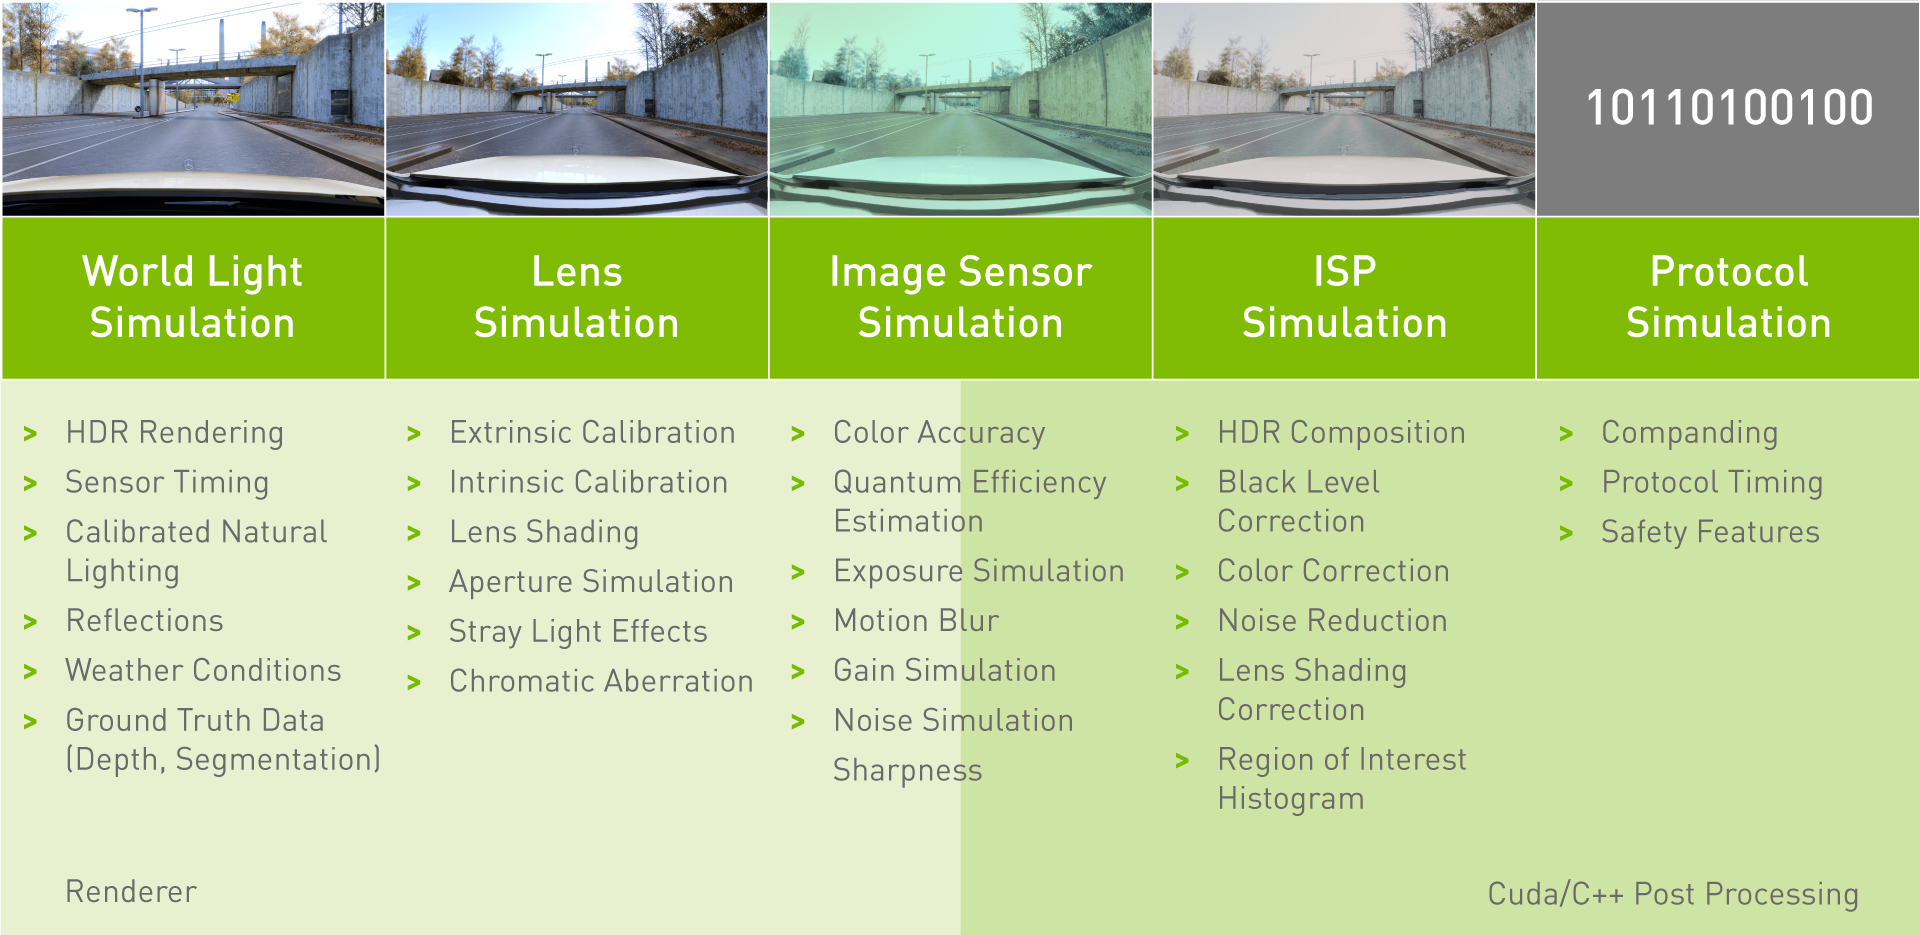
Figure 1. Summary of camera model components
For this validation, we chose to use a set of camera models from the NVIDIA DRIVE Hyperion sensor suite. Figure 2 details the camera models used throughout testing.
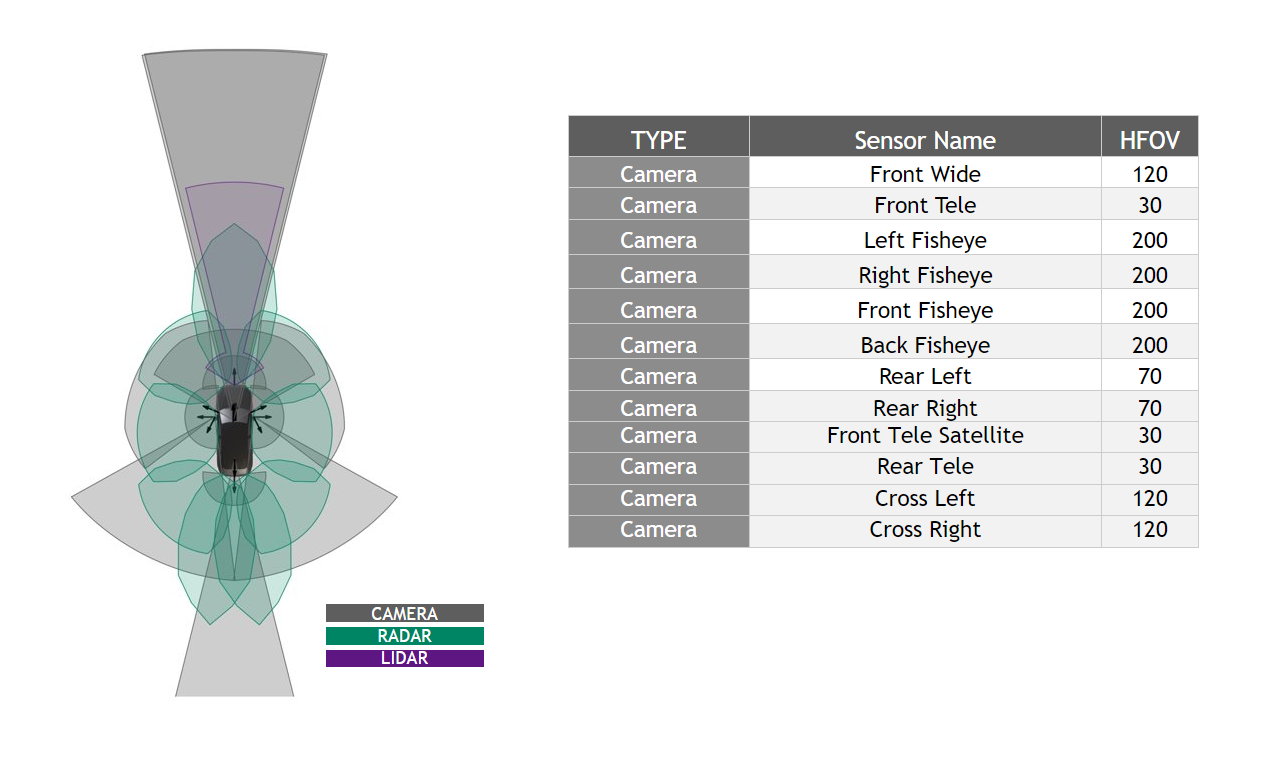
Figure 2. NVIDIA DRIVE Hyperion 8 sensor set
Camera calibration
AV perception requires a precise understanding of where the cameras are positioned on the vehicle and how each unique lens geometry of a camera affects the images it produces. The AV system processes these parameters through camera calibration.
A simulated camera sensor should accurately reproduce the images of a real camera when subjected to the same calibration and a digital twin environment. Likewise, simulated camera images should be able to produce similar calibration parameters as their real counterparts when fed into a calibration tool.
We used NVIDIA DriveWorks, our sensor calibration interface, to estimate all camera parameters mentioned in this post.
Validation of camera characteristics can be done in these steps:
- Extrinsic validation: Camera extrinsics are the characteristics of a camera sensor that describe its position and orientation on the vehicle. The purpose of extrinsic validation is to ensure that the simulator can accurately reproduce an image from a real sensor at a given position and orientation.
- Calibration validation: The accuracy of the calibration is verified by computing the reprojection error. In real-world calibrations, this approach is used to quantify whether the calibration was valid and successful. We applied this step here to calculate the distance between key detected features reprojected on real and simulated images.
Intrinsic validation
Intrinsic camera calibration describes the unique geometry of an individual lens more precisely than its manufacturing tolerance by setting coefficients of a polynomial.

is the distance in pixels to the distortion center
are the coefficients of the distortion function
(theta) is the resulting projection angle in radians
The calibration of this polynomial enables an AV to make better inferences from camera data by characterizing the effects of lens distortion. The difference between two lens models can be quantified by calculating the max theta distortion between them.
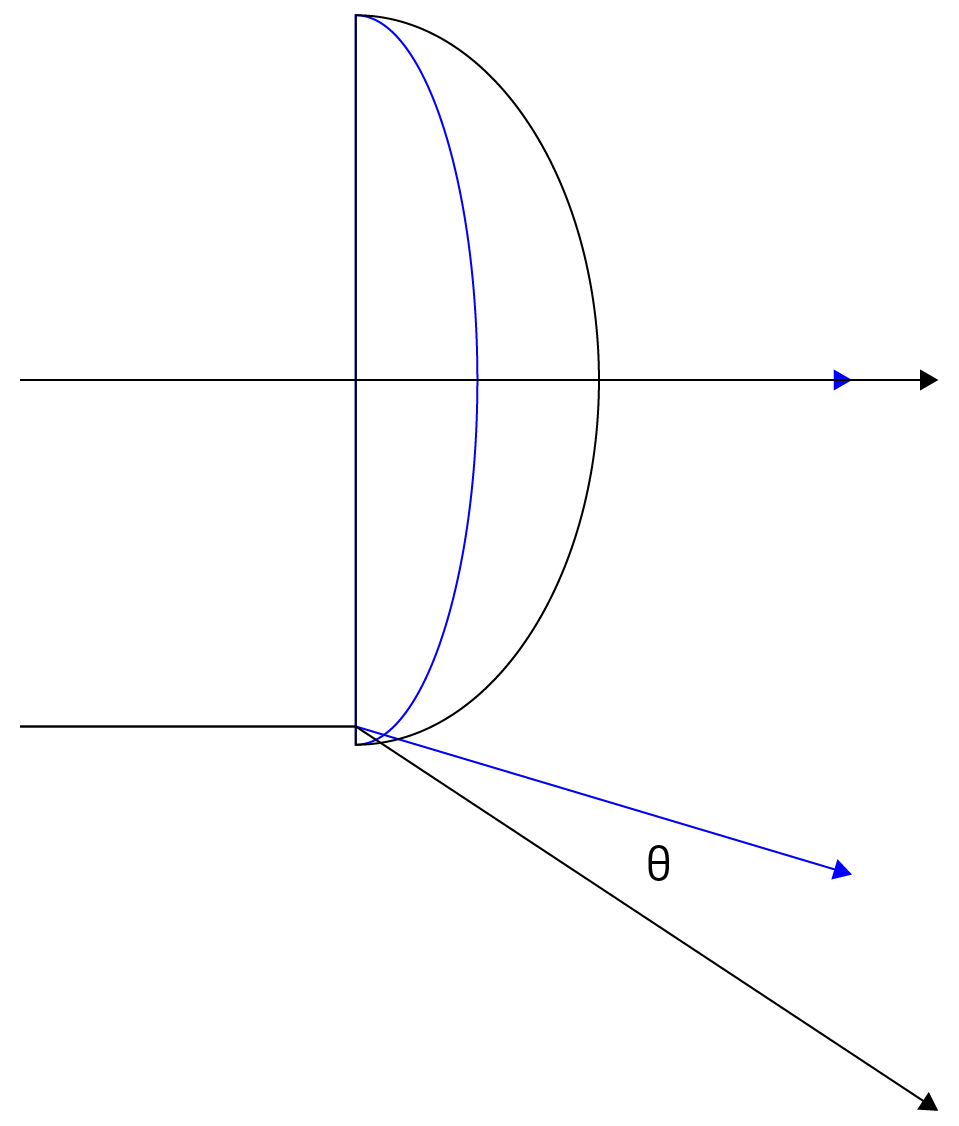
Figure 3. Max theta distortion diagram
Max theta distortion describes the angular difference of light passing through the edge of a lens (corresponding to the edge of an image), where distortion is maximized. In this test, we used the max theta distortion to describe the difference between a lens model generated from real calibration images and one from synthetic images.
We validated the intrinsic calibration of our simulated cameras according to the following process:
- Perform intrinsic camera calibration: Mounted cameras on a vehicle or test stand capture video of a checkerboard chart moving through each camera’s field of view at varying distances and degrees of tilt. This video is input into the DriveWorks Intrinsics Constraints Tool, which will pull distinct checkerboard images from it and output the polynomial coefficients for each camera in the calibration.
- Produce simulated checkerboard calibration images: The real camera lens calibration data are used to re-create each camera in DRIVE Sim. We re-created the real checkerboard images in simulation from the estimated chart positions and orientations output by the calibration tools.
- Produce intrinsic calibration from synthetic images: We input synthetic images into DriveWorks calibration tools to produce new polynomial coefficients.
- Compute max theta distortion from real to simulated lens: For each lens, we compared the geometry defined by the calibration from real images to the geometry defined by the calibration from the simulated images. We then found the point where the angle that light passes through varies most between the two lenses. The variation is reported as a percentage of the theoretical field of view of that lens (
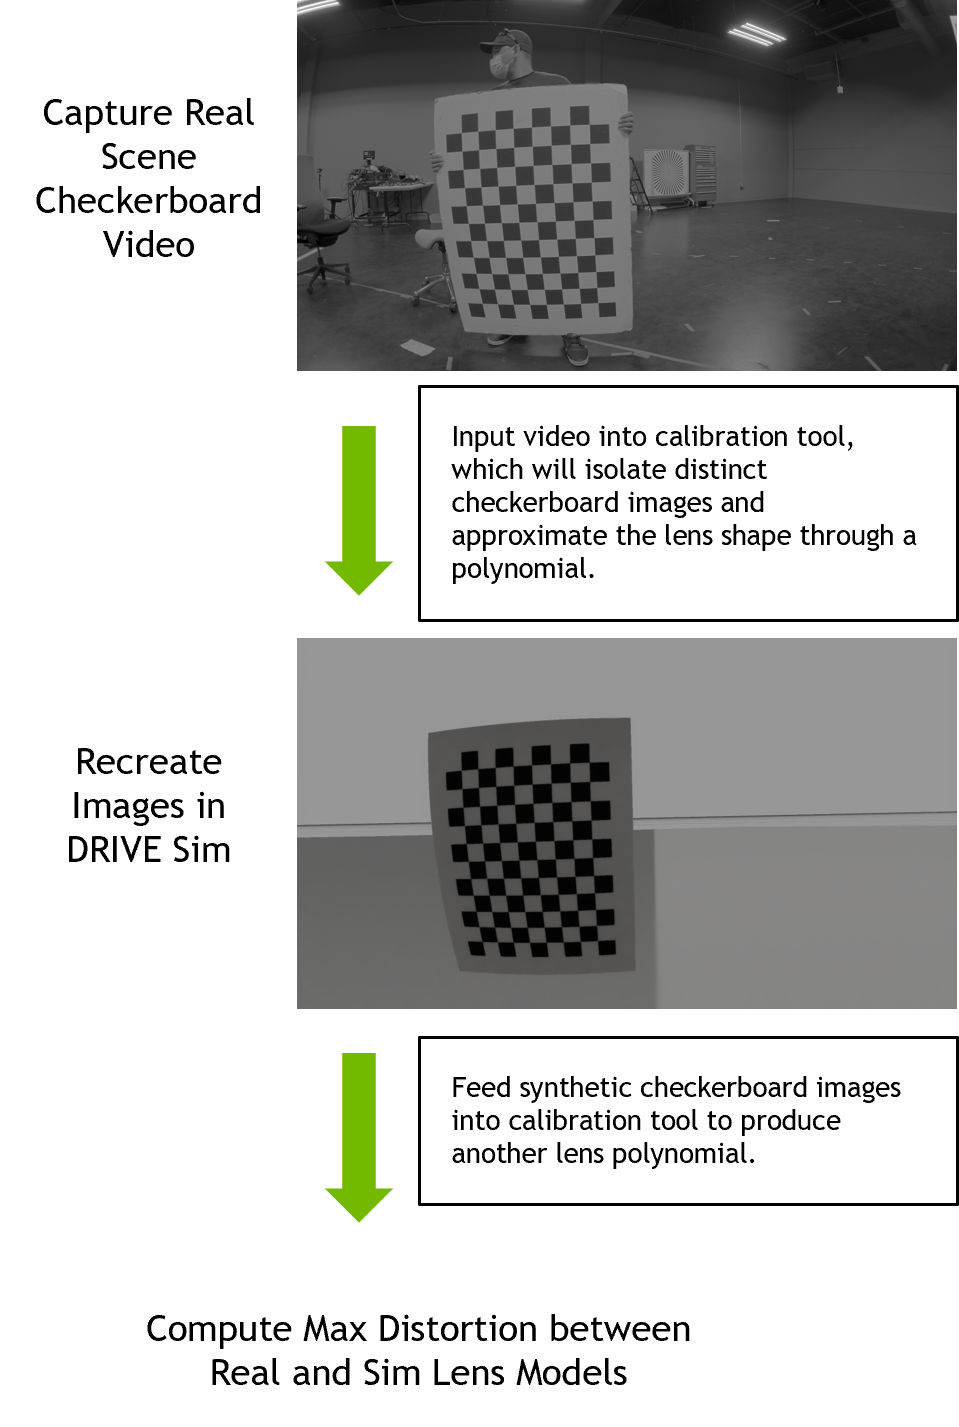
Figure 4. Intrinsic validation process
The max theta distortion for each camera derived by comparing its real f-theta lens calibration to the calibration yielded from simulated images.
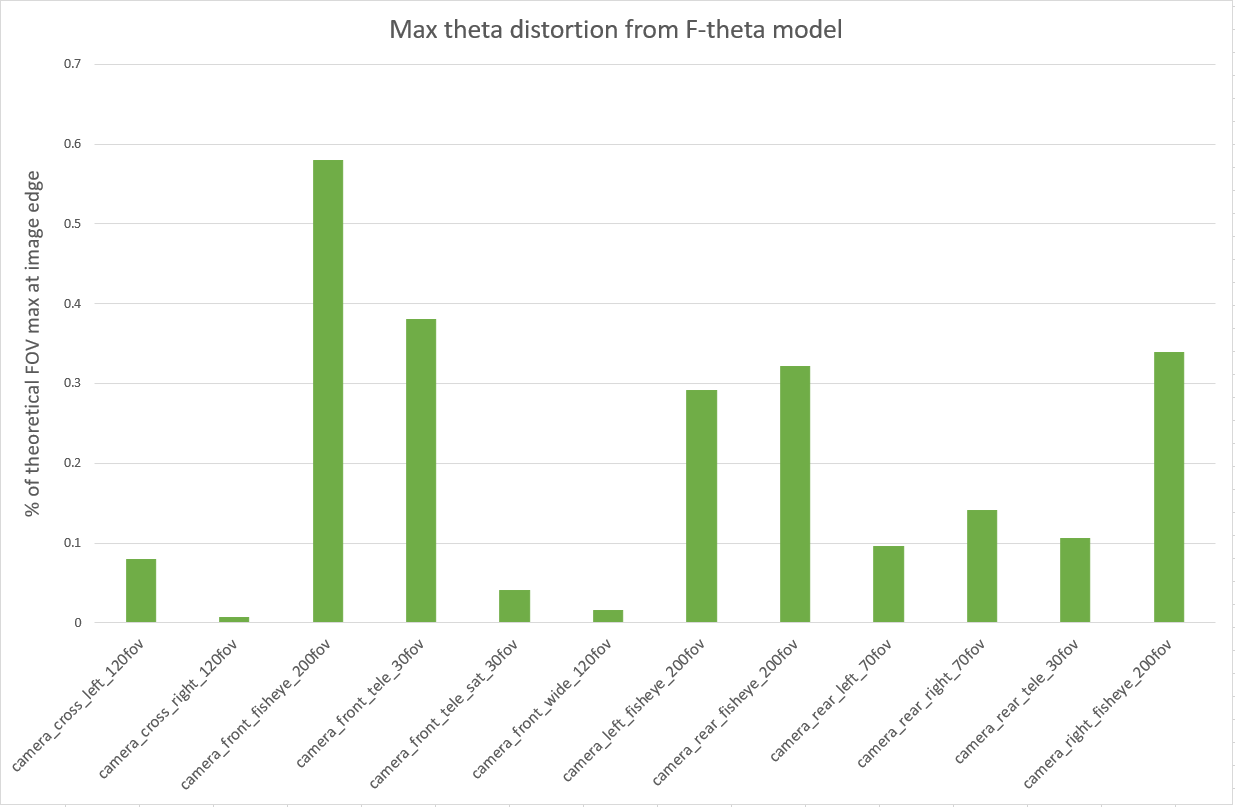
Figure 5. Max theta distortion from F-theta model
This first result exceeded our expectations as the simulation is behaving predictably and reproducing the observed outcomes from real-world calibrations.
This comparison provides a first degree of confidence in the ability of our model to accurately represent lens distortion effects because we observed a small discrepancy between real and simulated cameras. The front telephoto lens is difficult to constrain in real life, hence we expected it to be an outlier in our simulation results.
The fisheye cameras calibrations exhibit the largest real-to-sim difference (0.58% of FOV for the front fisheye camera).
Another way to look at these results is by considering the effect of the distortions on the generated images. We compared the real and simulated detected features from the calibration charts in a later step, described under the Numerical Feature Markers comparison.
We proceeded with the extrinsic validation method.
Extrinsic validation
We validated the extrinsic calibration of our simulated cameras according to the following process:
- Perform extrinsic camera calibration: Mounted cameras on a vehicle or test stand capture images of multiple calibration patterns (AprilTag charts) located throughout the lab. For our test, cameras were mounted per the NVIDIA DRIVE Hyperion Level 2+ reference architecture. Using the DriveWorks calibration tool, we calculated the exact position and orientation of the camera and the calibration charts in 3D space.
- Re-create scene in simulation: Using extrinsic parameters from real calibration and ground truth of AprilTag chart locations, the cameras and charts are spawned in simulation at the same relative positions and orientations as in the real lab. The system generates synthetic images from each of the simulated cameras.
- Produce extrinsic calibration from synthetic images and compare to real calibration: Synthetic images are inputted into DriveWorks calibration tools to output the position and orientation of all cameras and charts in the scene. We calculated the 3D differences between extrinsic parameters derived from real vs. synthetic calibration images.
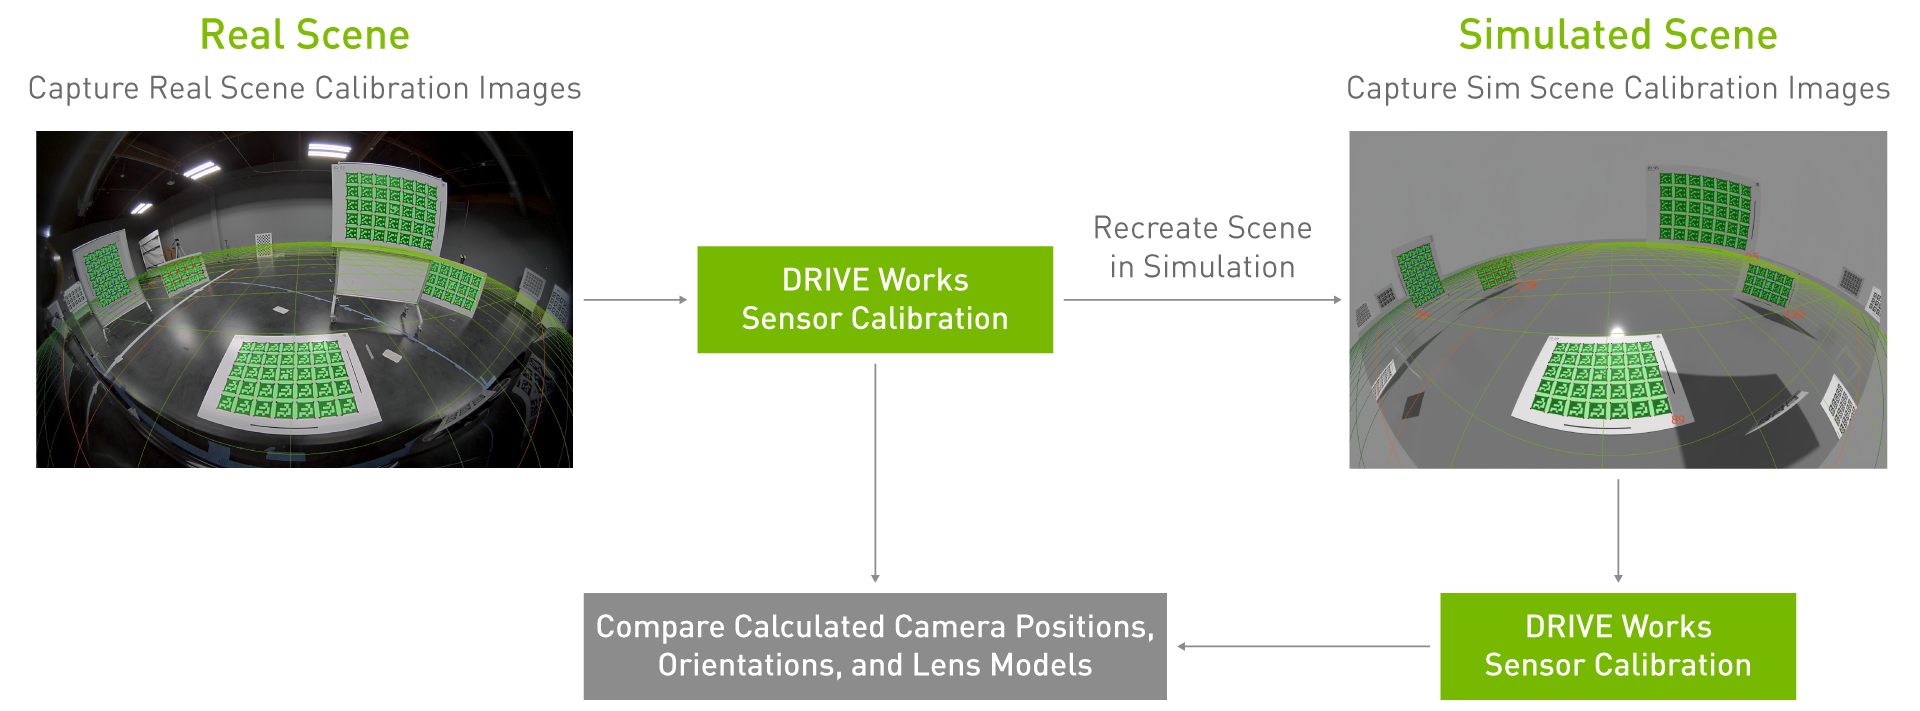
Figure 6. Extrinsic validation process
Figure 7 shows the differences in extrinsic parameters for each of the 12 cameras on the tested camera rig, comparing the real camera calibration to the calibration yielded by the simulated camera images. All camera position parameters matched within 3 cm and all camera orientation parameters matched within 0.4 degrees.
All positions and orientations are given with regard to a right-handed reference coordinate system with origin at the center of the rear axle of the car projected onto the ground plane, where x aligns with the direction of the car, y to the left, and z up. Yaw, pitch, and roll are counter-clockwise rotations around z, y, and x.
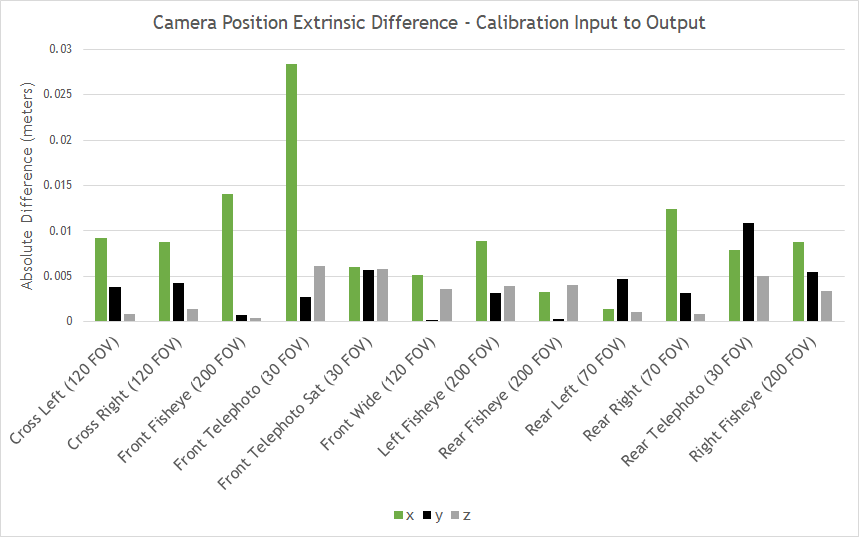
Figure 7. Camera position extrinsic differences–calibration input to output
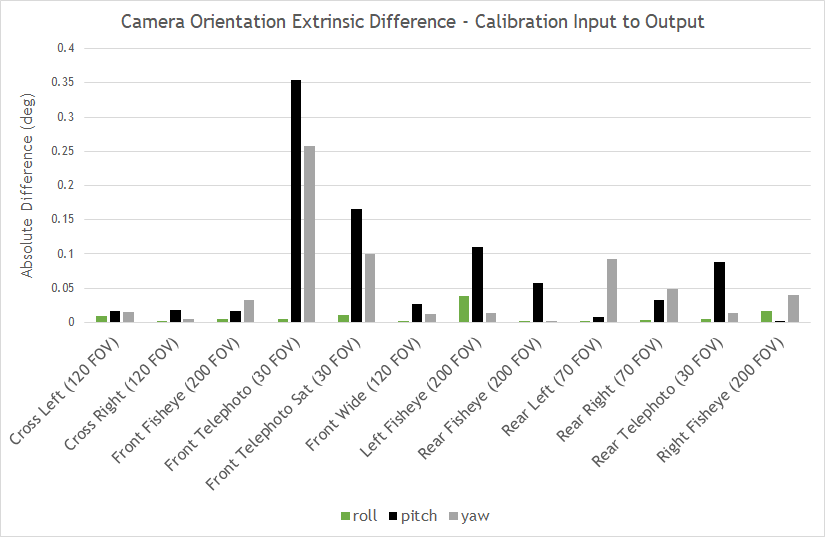
Figure 8. Camera orientation extrinsic differences–calibration input to output
Results
The validation previously described compares real lab calibrations to digital twins’ calibrations in DRIVE Sim RTX renderer. The RTX renderer is a path-tracing renderer that provides two rendering modes, a real-time mode and a reference mode (not real-time, focus on accuracy) to provide full flexibility depending on the specific use case.
This full validation process was done with digital twins rendered in both RTX real-time and reference modes to evaluate the effect of reduced processing power allocated to rendering. See a summary of the real-time validation results in the following table, with reference results available for comparison.
As expected, there was a slight increase in real-to-sim error for most measurements when rendering in real-time due to reduced image quality. Nonetheless, calibration based on real-time images matched lab calibrations within 0.030 meters and 0.041 degrees for cameras, 0.041 meters and 0.010 degrees for AprilTag locations, and 0.49% of theoretical field of view for the lens models.
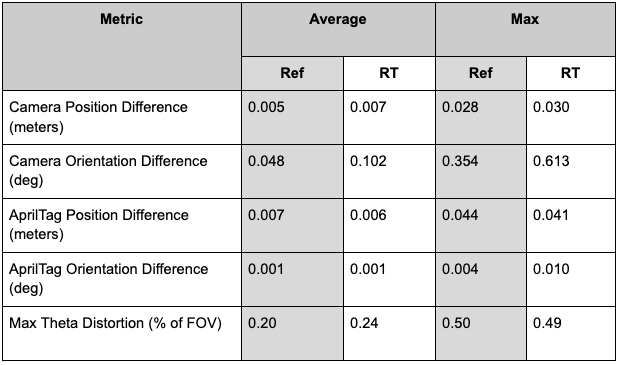
Figure 9. Reference vs. real-time validation results
The following figures indicate the average and max position or orientation differences across 22 AprilTag charts located in the real and simulated environments. The average position difference from the real charts to their digital twins was less than 1.5 cm along all axes and no individual chart’s position difference exceeded 4.5 cm along any axis.
The average orientation difference from the real charts to their digital twins was less than 0.001 degrees for all axes and no individual chart’s orientation difference exceeded 0.004 degrees along any axis.
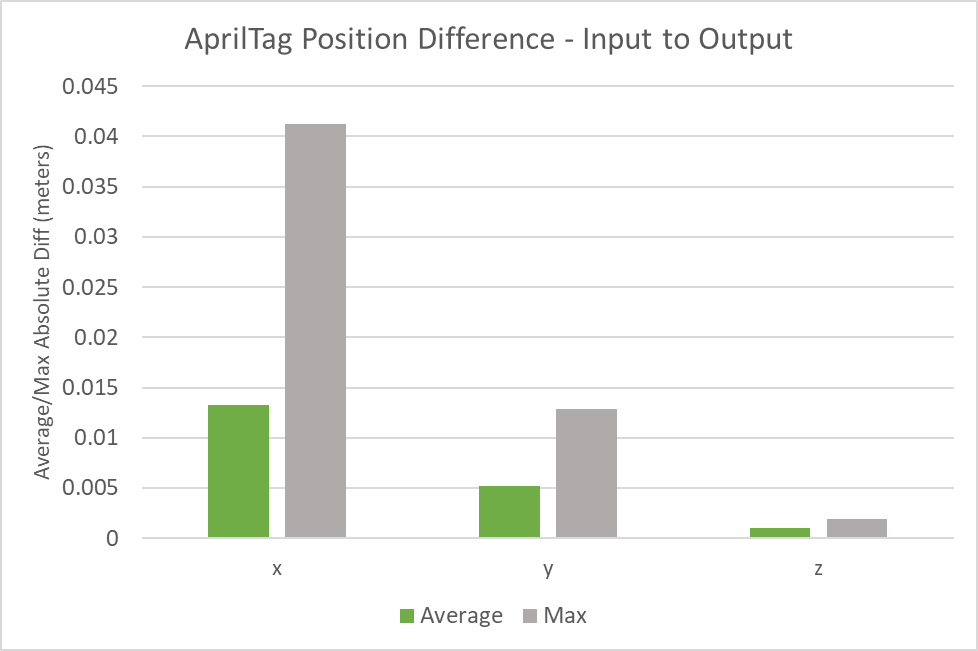
Figure 10. Average/max AprilTag orientation differences–calibration input to output
There is currently no standard to define an acceptable error under which a sensor simulation model can be deemed viable. Thus, we compared our position and orientation delta values to the calibration error yielded by real-world calibrations to define a valid criterion for the maximum acceptable error for our simulation. The resulting errors from our tests are consistently smaller than the calibration error observed in the real world.
This calibration method is based on statistical optimization techniques used by our calibration tool and hence can introduce its own uncertainty. However, it is also important to note that the DriveWorks calibration system has been consistently used in research and development for sensor calibration with a high degree of accuracy.
These results also demonstrate that the calibration tool can function with simulation-rendered images and provide comparable results with the real world. The fact that the real-world calibration system and our simulation are in agreement is a first significant indicator of confidence for our camera simulation model.
Moreover, this method also validates the simulator as a whole, because the digital twin used for calibration models the scene in its entirety with all 12 cameras, without tweaking values to improve results.
To assess further the validity of this method, we then ran a direct numerical feature marker comparison between the real and simulated images.
Numerical feature markers comparison
The calibration tool provides a visual validator to reproject the calibration charts positions onto the input images based on the estimated intrinsic parameters. The images show an example of the overlay of the detected features and the reprojection statistics (mean, std, min, and max reprojection error) for the simulated and real camera.

Figure 11. Overlay target positions onto input images for camera_rear_fisheye_200fov
Computing the reprojection error enables us to assert further the validity of the prior calibration method. This approach parses the calibration tool’s detected features and compares them to the ones in the real image.
Here we considered the corners of each of the AprilTags in the calibration charts as the feature markers. We calculated the distance in pixels between the feature markers detected on real images compared to synthetic images, both for path-traced and real-time simulation.
The following figure shows an average distance of 1.4 pixels between reference path-traced simulated and real feature markers. The same comparison based on the real-time simulated dataset yields an average reprojection error of 1.62 pixels.
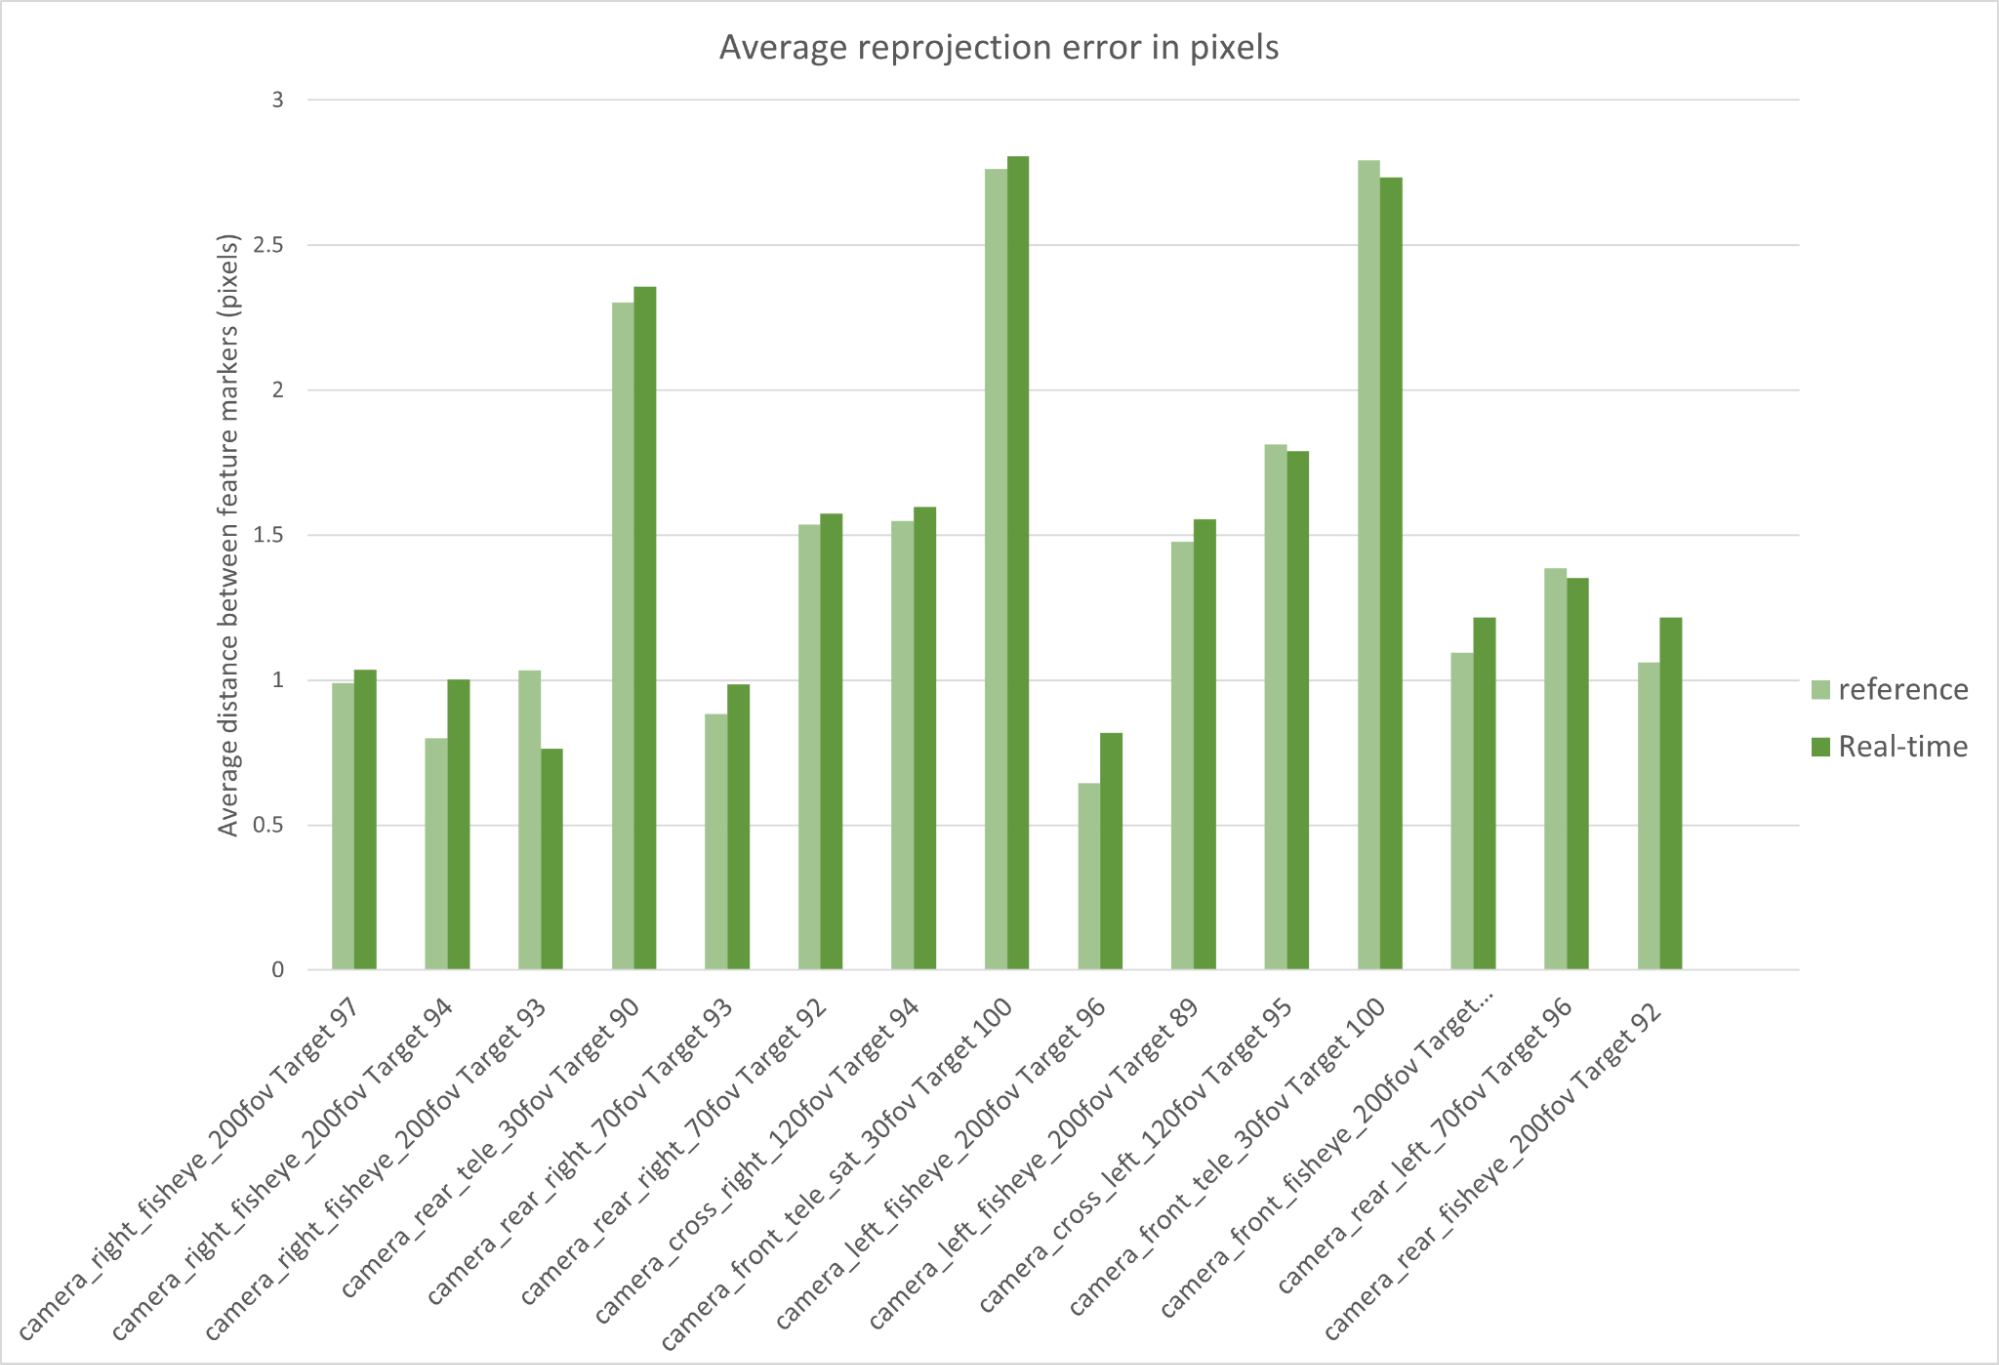
Figure 12. Average reprojection error (reference vs. real time)
Both values are the real-world projection error threshold of 2 pixels used to evaluate the accuracy of the real-world calibrations. The results are very promising, in particular because this method is less dependent on the inner workings of our calibration tool.
In fact, the calibration tool is only used here to estimate the detected feature markers in each image. The comparison of the markers is done based on a purely algorithmic analysis of objects in 3D space.
Color accuracy assessment
The camera calibration results demonstrate pixel correspondence of images produced by our camera sensor model to their real image counterparts. The next step is to validate that the values associated with each of those pixels are accurate.
We simulated a Macbeth ColorChecker chart and captured an image of it in DRIVE Sim to validate image quality. The RGB values of each color patch were then compared to those of the corresponding real image.
In addition to the real images, we also introduced the Iray renderer, NVIDIA’s most realistic physical light simulator, validated against CIE 171:2006. We performed this test first using simulated images generated with the Iray rendering system, then with NVIDIA RTX renderer. The comparison with Iray gives a good measure of the capability of the RTX renderer against a recognized industry gold standard.
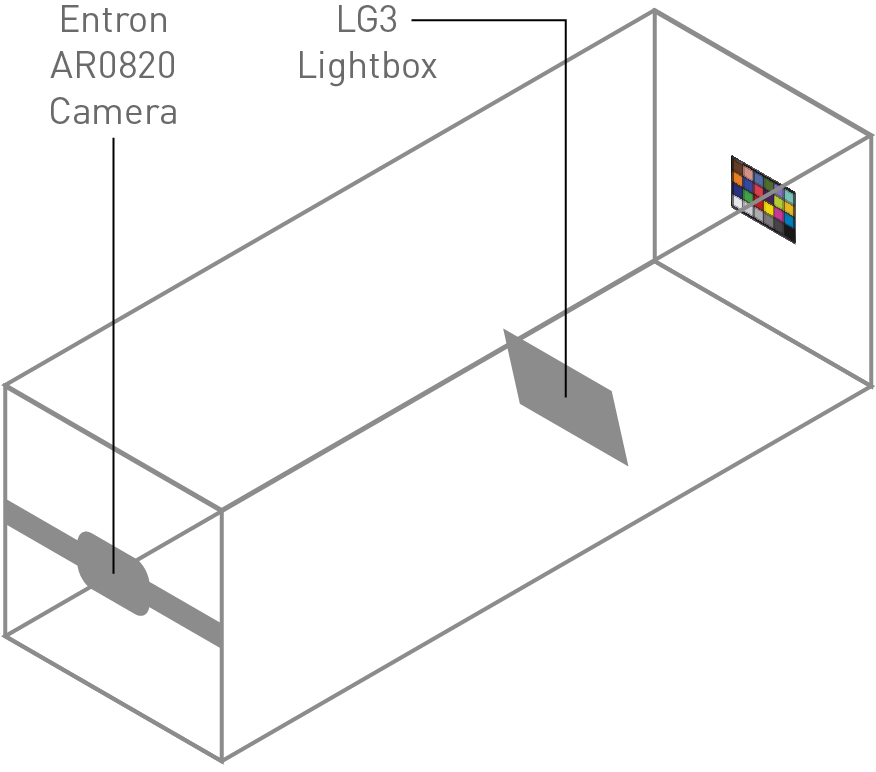
Figure 13. Image quality test setup
We validated the image quality of our simulated cameras according to the following process:
- Capture image of Macbeth ColorChecker chart in test chamber: A Macbeth ColorChecker chart is placed at a measured height and illuminated with a characterized external light source. The camera is placed at a known height and distance from the Macbeth chart.
- Re-create image in simulation: Using the dimensions of the test setup, calibrated Macbeth chart values, and the external lighting profile, we rendered the test scene using the DRIVE Sim RTX renderer. We then used our predefined camera model to re-create the images captured in the lab.
- Extract mean brightness and RGB values for each patch: We averaged the color values across all pixels in each patch for all three images (real, Iray, DRIVE Sim RTX renderer).
- Compare white-balanced brightness and RGB values: Measurements are normalized for each patch against patch 19 for white-balancing. We compared the balanced color and brightness values across the real image, Iray rendering, and RTX rendering.
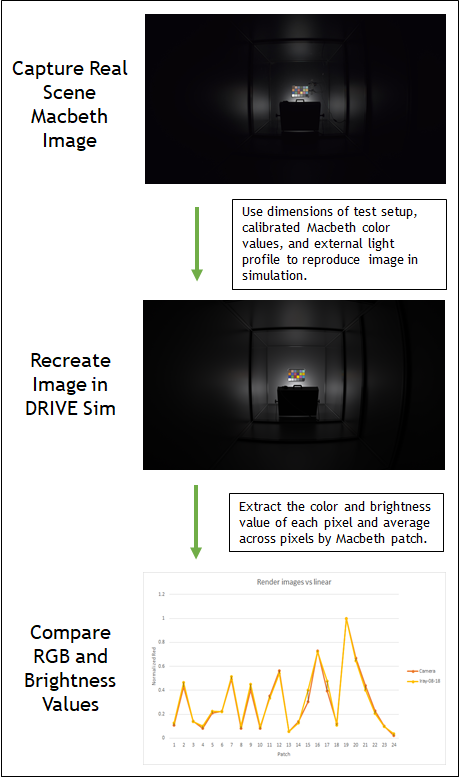
Figure 14. Macbeth ColorChecker test process

Figure 15. Macbeth ColorChecker reference chart
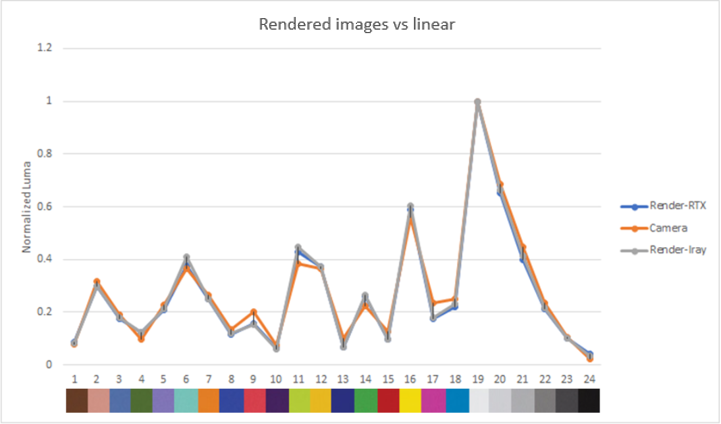
Figure 16. Real and rendered luma and RGB comparisons
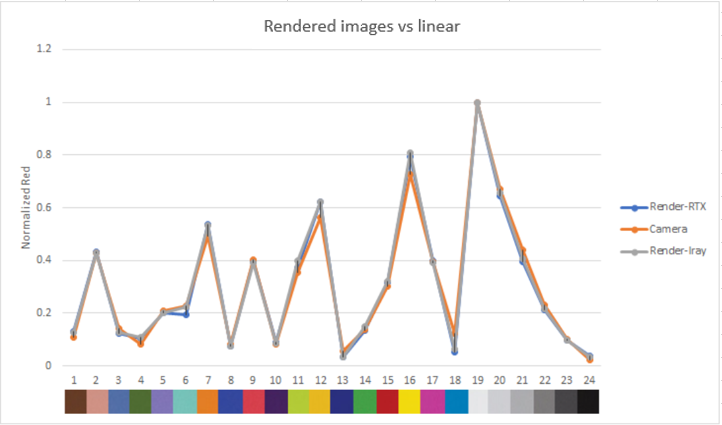
Figure 17. Comparison of red color contributions, rendered images vs real image
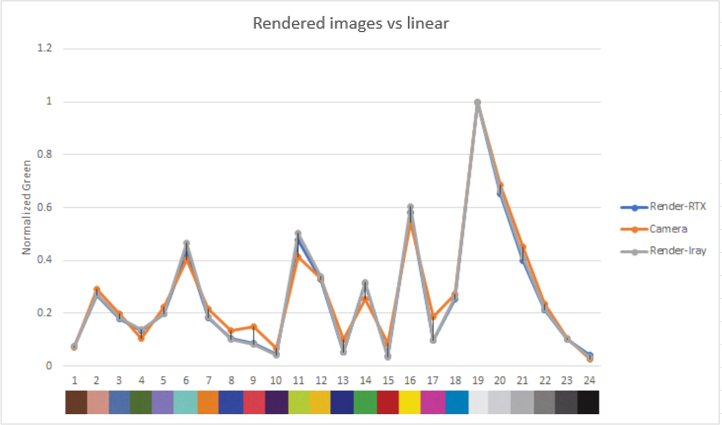
Figure 18. Comparison of green color contributions, rendered images vs real image
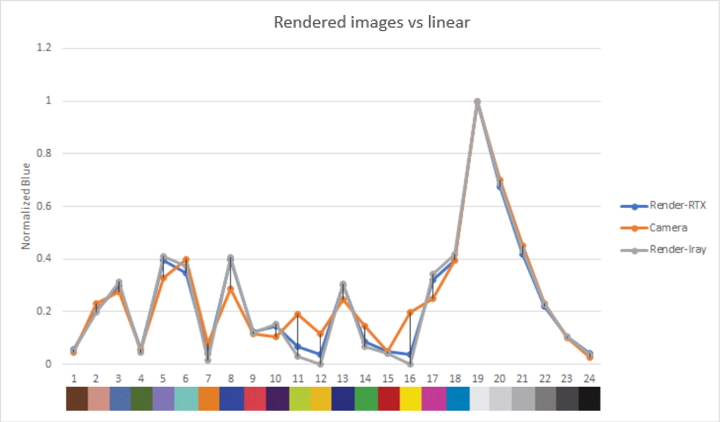
Figure 19. Comparison of blue color contributions, rendered images vs real image
The graphs show the normalized luma and RGB output for each color patch in the rendered and real images.
Both the luma and RGB values for our rendered images are close to the real camera, which gives confidence in the ability of our sensor model to reproduce color and brightness contributions accurately.
For a direct visual comparison, we showed the stitched white-balanced RGB values of the Macbeth chart real and synthetic images (Iray, real-time, and path-traced contributions).
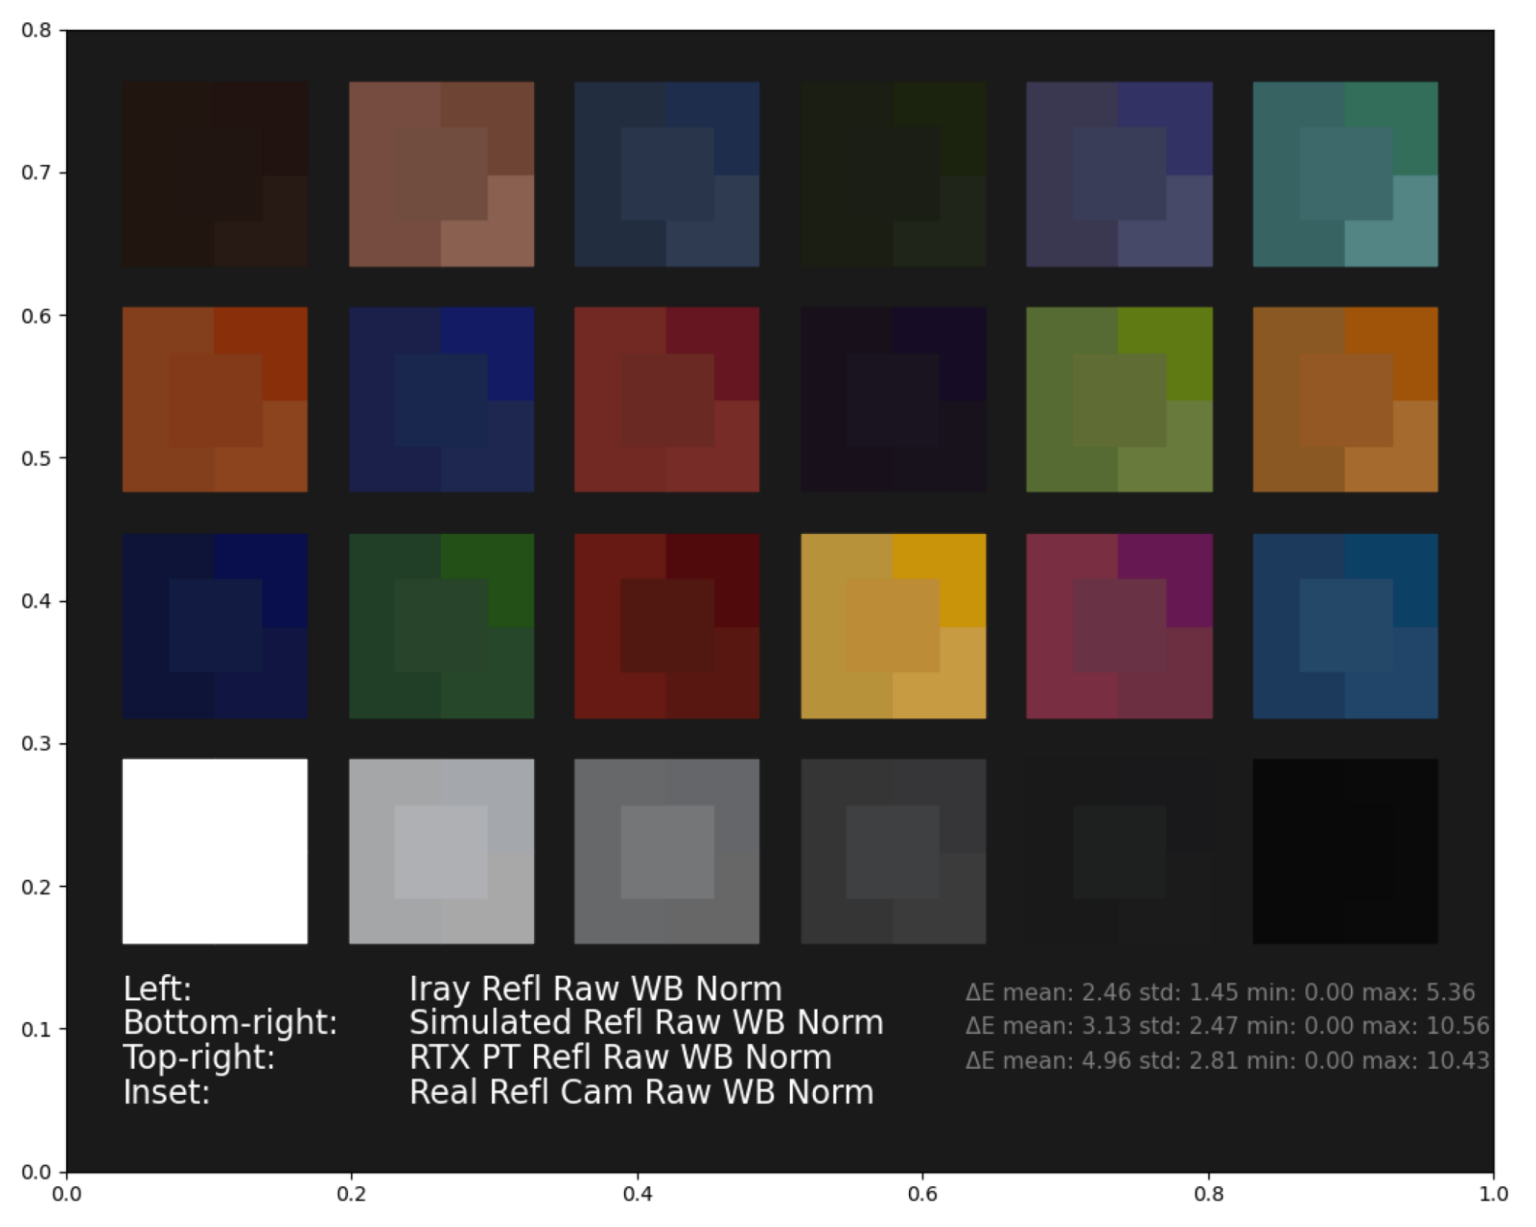
Figure 20. Stitched RGB patches Macbeth color chart (synthetic vs. real)
We also computed ΔE (see results in Figure 22), a CIE2000 computer vision metric, which quantifies the distance between the rendered and original camera values and is often used for camera characterization. A lower ΔE value indicates greater color accuracy and the human eye cannot detect a value under 1.
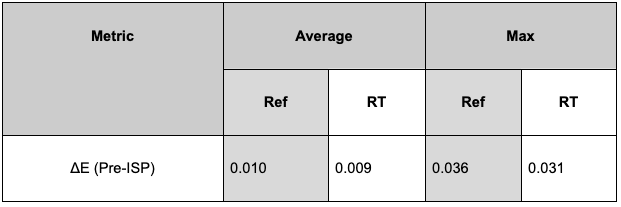
Figure 21. Reference vs. real-time results for CIE2000
While ΔE provides a good measure of perceptual color difference and is recognized as an imaging standard, it is limited to human perception. The impact of such a metric on a neural network will remain to be evaluated in further tests.
Conclusion
This post presented the NVIDIA validation approach and preliminary results for our DRIVE Sim camera sensor model.
- We concluded that our model can accurately reproduce real cameras’ calibrations parameters with an overall error that is below real-world calibration error.
- We also quantified the color accuracy of our model with reference to the industry standard Macbeth color checker and found that it is closely aligned with typical R&D error margins.
- In addition, we concluded that RTX real time rendering is a viable tool to achieve this level of accuracy.
This confirms that the DRIVE Sim camera model can reproduce the previously mentioned parameters of a real-world camera in a simulated environment at least as accurately as a twin camera setup in the real world. More importantly, these tests provide confidence to users that the outputs of the camera models, as far as intrinsics, extrinsics, and color reproduction, will be accurate and can serve as a foundation for other validation work to come.
The next steps will be to validate our model in the context of its real-world perception use cases and provide further results on imaging KPIs for the model in open-loop.
Carène Kamel
Product Manager, DRIVE Sim, NVIDIA
Ashley Reid
Senior Software Engineer, NVIDIA
Fabian Plepp
Senior System Engineer, Camera Simulation, DRIVE Sim, NVIDIA